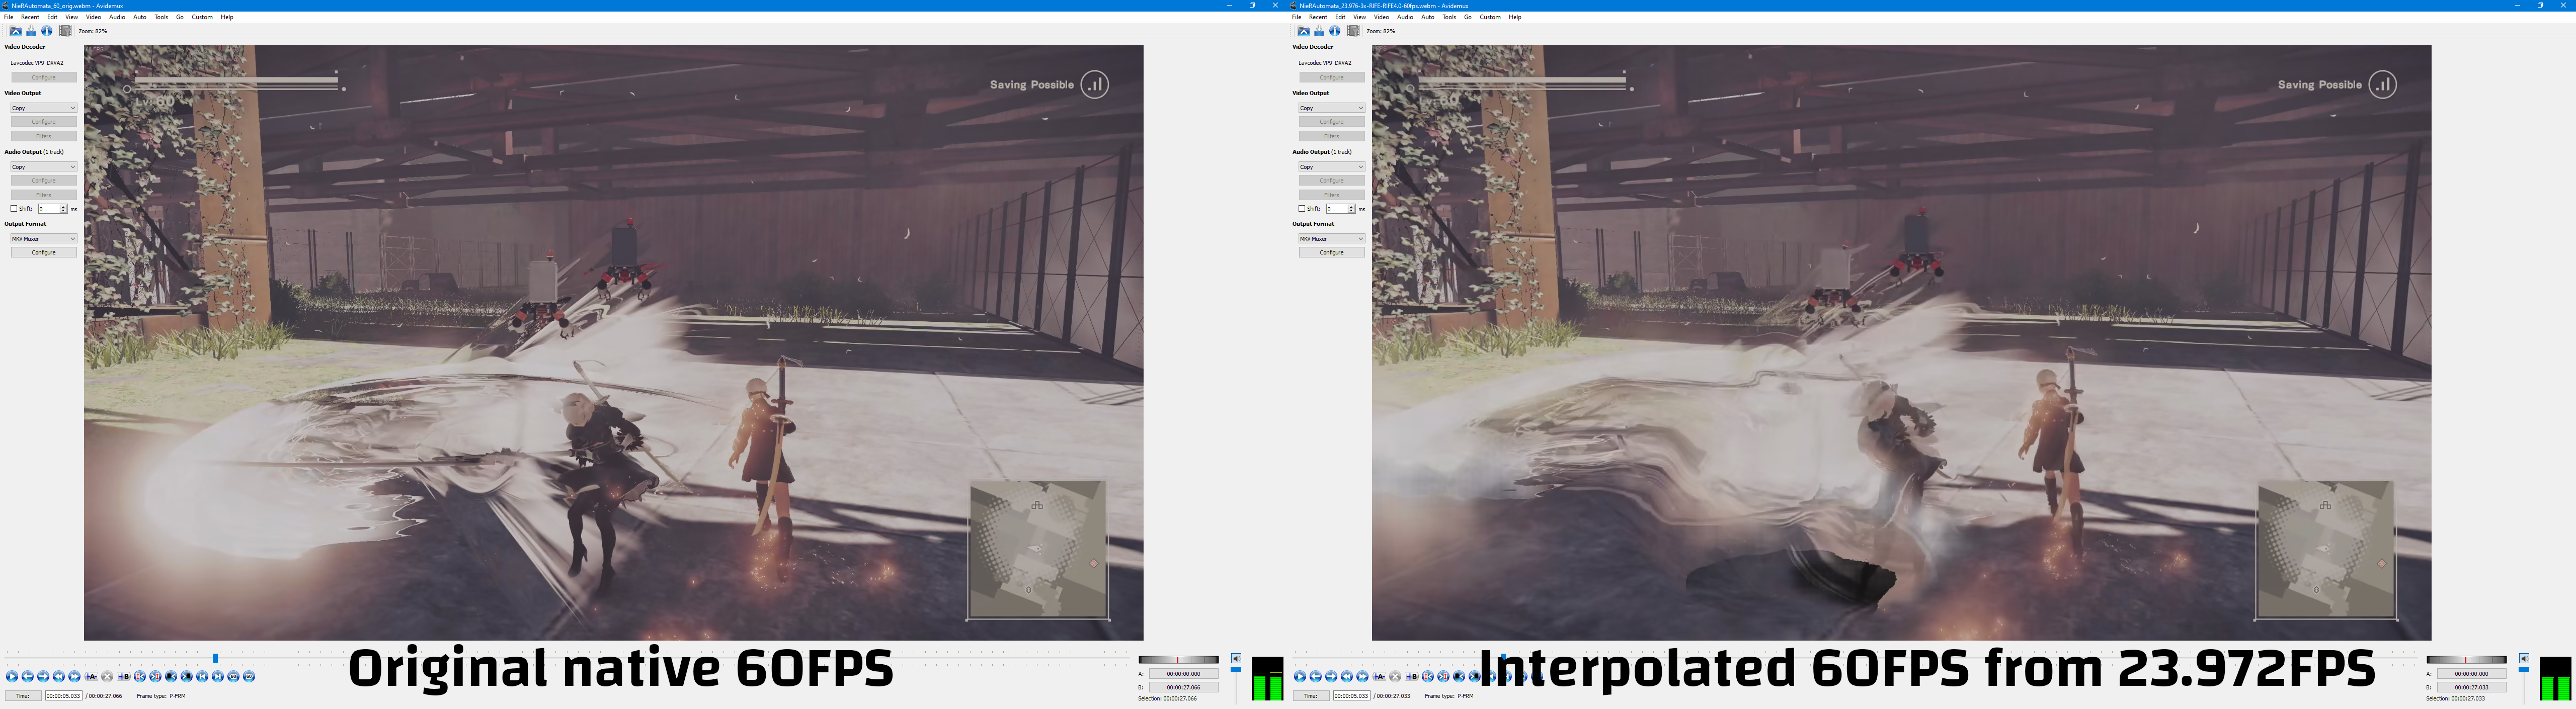
Stop upscaling video to 4K60FPS

Updated 2023/01/03: Added a bit about Frieren EP9.

On YouTube there’s always someone using AI to upscale to 4K and interpolate frames in anime openings. Some people think it looks good because it “moves” more and they are wrong.

I like referencing the video of Noodle on Smoother animation ≠ Better animation. You do not need to watch this video to understand this post but I still recommend watching it as Noodle is an actual animator as I don’t plan on just repeating what this video says.
I’ll be using my own words and examples.

What is upscaling?

When it comes to images and videos upscaling is increasing the dimension of the frame. To illustrate this example let’s take a 102 by 102 pixel image and upscale it using Photoshop and Waifu2x:

Click to enlarge

Doubling the image’s dimension does harm the quality of the image by doubling and softening the pixels. The 4 times image is unusable and down right bad.

Waifu2x uses a deep convolutional neural network to try minimize the quality loss and retain the detail from the original image. It works quite nicely bit but it far from perfect. Other AI enhancements can be used to upscale images.

In all the illustrated cases we are taking an image that is 102 pixels by 102 and adding more pixels. The only thing we can do is thus interpolating.

What is interpolating?

Interpolation is a very complicated subject that can be basically watered down to estimating new data based on existing data.

In the case of this post I already referenced interpolating pixels to fill in the blanks when upscaling an image. If we took an image and did not interpolate pixels we would retain the original pixels but spaced out in a grid like this:

Click to enlarge

Since I’m increasing the size from 102 by 102 pixels to 408 by 408 pixels I’ve blacked out the pixels that will have to be estimated. Different sharpening and scaling algorithms will process the images differently and alter the output.
This example is only illustrating what is missing and what needs to be generated.

The same can be explained for increasing the framerate from 23.976 to 60FPS. Wait a second, 23.976FPS to 60FPS. Decimal numbers?

That’s a fun framerate to multiply to 60. Where are my comfy integer numbers? I like whole numbers. Anything that floats is complicated and scary.

Why interpolating DOESN’T work?

If upscaling images with AI can work pretty well, on the other hand the frame rate interpolation doesn’t work.

First of all the video frame rate needs to be constant, if it’s defined as 23.976FPS we would need multiply it by 2.5 to reach 59.94FPS to get as close to 60FPS as possible but it is not a whole number so we will need to alter existing frames while generating 1.5 frames for each existing frames.

And this breaks everything. Here are two 5 seconds sequences taken from the opening of Zom 100 on YouTube.

Original video:

AI enhanced video:

Let’s get the total number of frames the lazy way:

ffprobe -v error -select_streams v:0 -count_packets \
    -show_entries stream=nb_read_packets -of csv=p=0 \
    zom100_original_start_5sec.webm
# 127

ffprobe -v error -select_streams v:0 -count_packets \
    -show_entries stream=nb_read_packets -of csv=p=0 \
    zom100_ai_start_5sec.webm
# 323

If my math is right 323 / 127 = 2.543307086614173 making us close to the 2.5 multiplier. But let’s forget numbers because what really counts is the visuals.

Why is it ugly?

The gist of it is that we a creating new frames based on the previous and next frame while also altering existing frames to target the 60FPS that is being uploaded.

Let’s take a look frame by frame, each origin frame lasts for 2 seconds while AI enhanced frames last for 1/3 of a second. Left and right video isn’t synchronized as the frame rate cannot be divided by an integer value.

Obvious artifacting appears very early on around anything that moves. Sometimes it’s just blurring just like if motion blur (on the bike) was introduced and sometimes the shapes are deformed (such as the numbers).

Another example:

The upscaled image is also sharpened and denoised to some degree which ends up messing up the contrast on the line art.

But 60FPS is nice when gaming

Yes, when playing 3D games each frame is rendered before being displayed on the screen. Videos are different because each frames are already rendered.

This is like the difference between pre-rendered cutscenes and in-engine cutscenes. Pre-rendered cutscenes are designed in a way to be of a certain resolution, frame rate, compression and colorspace.

In-engine cutscenes on the other hand will usually target the game’s resolution, framerate, colorspace without applying any compression. Usually because some game engines will lock the frame rate to a lower value such as 30FPS because of engine limitations bad engine programming and design.

Rendering 30, 60, 120 or 144 frames a second by taking a picture of a 3D scene that is built right before being displayed is the key to fluidity.
Already rendered content will never be able to do such thing because of the missing information.

Real world example from 60 to 23.976 to 60

Here is NieR Automata at 60FPS:

Reducing the frame rate to 23.976FPS makes the motion look less satisfying:

Now let’s interpolate the framerate to 71.92806FPS and limit it to 60FPS with Flowframes that permits me to double or triple the frame rate (not set it to 60 directly) and notice how the video is choppy:

Here are the settings used:

This is exactly what is being done to those anime openings… Disgusting.

Let’s compare the original native 60FPS footage with the interpolated to 60FPS from 23.976FPS:

Click to enlarge
Click to enlarge
Click to enlarge

The screenshots talk by themselves and expression the difference in a much more obvious way, but let’s go a bit further and slow down the video clips while having them side by side and centered on 2B:

Slowed down to 25% does show how bad it gets. Same goes for that Jujutsu Kaisen S2 opening:

It jitters, the text is deformed… I hate it. Anime is not drawn for 60FPS.

Misguided demande exists

Sadly TVs are being sold with some smoothing technology and marketed as good looking. Not sure how people really perceive it as something nice while it should be weirding them out.

I also remember that the Hobbit being 48FPS at the movie theatre was something that did weird out people quite a bit, but was it because of the 3D effect included too? No idea.

NVidia is also working on adding frame rate smoothing to their GPUs when encoding, weird idea…

The reason I made this post is that I’m tired of seeing openings such as Zom100 and Jujutsu Kaisen S2 being upscaled, sharpened to hell and then interpolated to get weird motion and no improvement.

Conclusion

Most people that aim for +60FPS content do so because fluidity is important and enhances the pleasure of the visuals. Sadly most people don’t seem to actually pay attention to the composition and missout on the botched detail and weird movements.

Do I envy people that are not able to perceive what’s wrong with frame rate interpolating? No I don’t. I just think it’s sad that they are missing out on the destroyed detail.

This trend of upscaling and interpolating the framerate will not die anytime soon and this makes me sad because we have some very nice animations that are design for low framerate and will only work like so.

Spoilers ahead but here are some nice animations:

In all of the above scenes we have animations that are not 60FPS and do not need to be. Motion is properly conveyed through direction and effects.

As a closing note I suggest watching Satoshi Kon Editing Space & Time by Every Frame a Painting. At the 4:47 mark they talk about motion, it’s interesting to see how animation can convey more actions with less frames than live action.

Sousou no Frieren EP9

If Japanese animation proved anything in 2023 it’s that anime still doesn’t need to by high framerate. In Sousou no Frieren episode 9 we have multiple fights happening at the same time in the second half of the episode and the animation is perfect.

The fights are either fast paced and smooth or detailed and smooth. No frame is out of place. This is the standard of animation that we would expect from a full blown movie.

Since it’s copyrighted and I don’t want to stretch faire use (especially because Japan doesn’t really practice that) I will only be posting one clip.

Mad House published some tweets to show the behind the scenes for the keyframes:

Those keyframes are so clean the finished version can only be the best:

Full animated scene from Sakugabooru.

Windows 10’s image viewer is trash, bugged and won’t ever be fixed

I’ve been running Windows 10 since the end of 2017 and while it has worked fine most of the time I still get annoyed by the many quirks and bugs that Windows has had over the years even before Windows 10.

One of those issues is the the IME keyboard listing that automatically adds back English US at random times for no good reason, I’ve had that bug since Windows 8 and I want it to just not be a thing anymore. But this post isn’t about this bug.

This post if about the Windows 10 image viewer and how it consistently fails at doing what you would expect from a basic feature such as an image viewer.

Scrolling images through folders doesn’t work

I use the Windows image viewer to browse folder images, it’s integrated into Windows and should be able to handle the kind of files I throw at it such as PNGs, JPEGs and sometimes my CR3 RAWs.

It does need to be perfect when it comes to display images as it is a basic feature of any operating system.

When I open a image from within a folder I usually scroll through the pictures with the mouse wheel. So what’s wrong?

Basically what’s wrong is that if I stop scrolling for a couple of seconds, when I start scrolling the pictures again I’ll be starting back from the picture I first opened in the image viewer.
The image viewer loses track of where it last was. This happens consistently in folders with over 3000 media files…

I’m not the only one

Searching for it brings up a post about the same issue:

The usual response from the Independent Advisor is to reset the apps, then we are told to run DISM and update our system. The Microsoft forums have once again let down the whole world and not one managed to act surprised.

Now I must admit that the wording is not ideal and it also contains another issue that I do not care for. I still want to be able to scroll through my meme collection without going back to the very start and this is kinda forcing me into thinking about what it takes to make a proper image viewer.

I have not done C# in a long time and I think I would enjoy making a lightweight basic image viewer.

IrfanView always works

Back in the early 2000s I came across IrfanView, a graphic viewer that supports many formats and plugins. It’s a very powerful too that can view, convert, batch process and basically save your day when it comes to media files.
It’s a graphic viewer that even plays music! Talk about going above and beyond.

When I open an image I can scroll through the folder’s images with the mouse wheel AND ALSO the previous and next mouse buttons. I could do that on Windows 7, 8 and 8.1. How come this isn’t a thing anymore on Windows 10?!

It also can rotate images based on EXIF data and it just works. The only thing I need it an image viewer that just works!

Conclusion

Windows is a total let down when it comes to basic features but the good thing is that for now we can still install third party soft such as IrfanView, MPC-BE, ShareX and many more.

I hope Microsoft won’t kill this anytime soon but they are kinda hinting at taking control over what can be installed with their Microsoft Store, just by letting such an abomination exist.

I trust Microsoft will do what’s wrong for their consumers because we live in the era of SaaS and never ending advertising.

Export video with alpha channel in Davinci Resolve

A great alternative to the Adobe video editing suite is Davinci Resolve because it’s free (paid version exists, locks just a bit of features).

Exporting in Davinci Resolve

Let’s say you have a timeline with your elements places and transparency set. You will now go to the deliver tab, select Quicktime as the format and GoPro Cineform as the codec.

The most important thing is to select RGB-16 in the type and tick export Alpha.

This is the final step unless you need to publish the file as a WebM.

Convert the MOV to WEBM

When building alerts and overlays, certain services like StreamElements won’t accept the Quicktime file, you will need to convert it to a WebM with the VP9 codec to retain the transparency.

Use FFmpeg with the following command line:

ffmpeg -i inputmove.mov -c:v libvpx -pix_fmt yuva420p -b:v 2000k -auto-alt-ref 0 output.webm

Keep in my you can change the bitrate and increase it by tweaking the value following -b:v.

Conclusion

This small trick is something I spent a long time looking for and I have had mixed results with it. But lately I’ve been getting into preparing custom alerts on StreamElements for my own streams and I was hoping to add something nice.

Adding subtitles to your stream

Ever wanted to subtitle your stream in your language and add one or two other languages with automatic translation? Looks like there’s a tool for that.

Step 1: Setting up a Apps Script (Google)

Setting up the Apps Script start with creating a new script on Apps Script: https://script.google.com

In the editor you will need to paste the following code:

function doGet(e) {
  const params = e.parameter
  var translatedText = LanguageApp.translate(params.text, params.source, params.target);
  const output = ContentService.createTextOutput();
  output.setMimeType(ContentService.MimeType.JSON);
  output.setContent(translatedText);
  return output;
}

The code will need to be deployed by click on the deploy menu on the top left:

The app must be deployed as a web app:

In the form you must let anyone access it:

When it’s deployed you will be provided the app key, this is what you will need for the next steps:

Step 2: Setting up the page

This is where the fun begins. There’s a form that is totally in Japanese that will require a couple of edits to be usable. Go here to start filling the form: https://sayonari.coresv.com/ninshikiChan/20210822_config.html

In the input field for Google Script API-KEY paste the one from your Apps Script. If you didn’t copy the key in the previous step you can retrieve if by going into the editor, in the deploy menu you need to click on manage deployments and you’ll find it under deployment ID:

Change the languages you want to use lower on the page, feel free to use Google Translate to find out what is what:

On the bottom of the page you will find the URL that you can copy and paste in your web browser, Google Chrome might be the only supported browser at the time of writting.

Step 3: Setting up OBS

Now comes the less fun part. Since the web page needs to listen to your voice you will have to run the page in your own Google Chrome instance, I’m unsure if it works on other browser since I wasn’t able to make the web app perform every single time.

To set it up all you need is a window capture and some filters. If the content of the web browser doesn’t appear you might need to disable hardware acceleration.

For the filters I usually just crop the top and a bit of the bottom, then I apply a chroma key filter to remove the screen background:

Congratulations, you are know streaming while subtitling at the same time. Subs are the way to go and this is what it looks like:

Troubleshooting

Refreshing the tab might help making the web app work, but if your speech isn’t appearing on screen you should instead try closing and reopening your browser.

I kept the tab loaded before closing Google Chrome and when I opened it again it was working.

Once again this isn’t flawless and some words might appear wrong or be heard wrong, these are the limits of speech recognition. Unless we slap some machine learning over your accent.

It might also strain your performances and require relaunching Google Chrome once in a while.

Credits

This is basically a translation of a Japanese page that was shared with me: http://www.sayonari.com/trans_asr/index_asr.html

This is a very useful tool for hearing impaired viewers and to enable people to appreciate better a stream in another language.

No ShadowPlay overlay in games, no recording after install a Stream Deck

I’ve recently purchased a Stream Deck MK2 by Elgato (Corsair) after playing around with the mobile app for a while and planning out some profiles for stuff like video editing and streaming.

It’s honestly a nice piece of equipment but I’ve had it for less than 24 hours and I’ve already found some problems.

Symptoms

After running the Stream Deck software to configure the keys and browse the plugins that are available I noticed that my ShadowPlay overlay isn’t showing in the critically acclaimed Final Fantasy XIV, which is unusual.

I closed the game, relaunched it, even rebooted and nothing. Time to try another game like Monster Hunter World, same. I confirmed that the main menu would show up but I had no overlay showing the replay buffer running.

Weirder was when I attempted to record it would ask me if I wanted to enable desktop recording. That’s when I started thinking that some software was grabbing ShadowPlay and keeping it to itself without ever releasing it.

I was looking for the icons on the bottom right

How to blacklist apps from ShadowPlay

The only way to fix this is to find a way to forbid ShadowPlay from hooking into it and of course Nvidia doesn’t give us tools to deal with that.
But on the bright side we have third party tools and I used the NVIDIA Profile Inspector, download a release here.

Download it, run it and the in the box on top search for Discord:

We will now add the StreamDeck.exe utility to that list by clicking on the add application to current profile button, browse to your Stream Deck installation folder and add StreamDeck.exe to it.

You might need to relaunch the Stream Deck utility, relaunch ShadowPlay through GeForce Experience or even reboot.
After that the utility will no longer trigger the overlay notification you get when you run a game and you should be able to record gameplay without enabling desktop recording.

Closing notes

I’ll make a proper post about how I use it at a later date (maybe) but for now I’m pretty much pleased with how easy it is to configure and I have started experimenting with some plugins such as Discord (mute/deafen toggle), iCUE profile changer (for my Corsair iCUE H150i RGB PRO XT) and a plugin to show CPU and GPU temps with HWiNFO.

I’ll get started with streaming a bit more often I guess and will improve my general workflow and battlestation setup.

Discord animated voice PNGs

Update 2023/05/03

Use Reactive.Fugi.Tech instead, it’s easier. You can setup your profile pictures and share a link to be integrated into OBS. It just works.

Original post

When building your streaming overlay you might want to add the other users that are in your current vocal chat but you want to customize a bit the way it’s displayed.

Discord doesn’t offer any of those options natively but with OBS Studio it’s possible to use some tricks.

CSS & web knowledge required to understand how to use CSS and how to link images.

Setting up the widget

Nothing really hard here, got to the Stream Kit page for Discord in the overlay section.

Setting up the server and the voice channel to be used will alter the URL so make sure you are using the right channel, but it’s possible to use a personal and private channel to use for PNG VTubing.

In OBS within your scene you need to create a browser source and use the provided link as such (no preview until it’s saved):

This is the basic setup. Next we will need a way to get the user ID on Discord.

Setting up Discord

To be able to get the user IDs we need to enable the developer options within Discord. Go to your settings within Discord and in the advanced tab you’ll find the developer toggle:

Getting the user’s ID is as simple as right clicking a name in the chat and clicking on the Copy ID button:

Customizing the widget

Since the widget is a web page within a web view in OBS Studio it’s easy to customize through CSS. Here’s the code to copied & pasted into the custom CSS text area in the browser source:

/*
To be used with the Voice Widget from the Discord Stream Kit
https://streamkit.discord.com/overlay

Do not hotlink images, please rehost them to avoid stealing
bandwidth and keep control over your images, Imgur is a fine
option for this.

Credits:
- Generator by kukushie: https://www.reddit.com/r/VirtualYoutubers/comments/k4q8jw/css_generator_for_discord_reactionary_images_that/
- Edited & improved by SenpaiSilver: https://twitter.com/SenpaiSilver

Please keep the credit chain when making & publishing your changes.
*/

@keyframes speak-now {
    0%  { bottom:0px; }
    15% { bottom:15px; }
    30% { bottom:0px; }
}

body {
    background-color: rgba(0, 0, 0, 0);
    margin: 0px auto;
    overflow: hidden;
}

/* Aligning everything on the same line */
.voice-state {
    display: inline-block;
}

/* Images must be square, change height for it to be scaled
back to 128px wide, or else deal with bad alignments */
.avatar {
    height: 128px !important;
    width: auto !important;
    border-radius: 0% !important;
    filter: brightness(50%);
}

.speaking {
    border-color: rgba(0,0,0,0) !important;
    position: relative;
    animation-name: speak-now;
    animation-duration: 1s;
    animation-fill-mode: forwards;
    filter: brightness(100%);
}

/* Hiding names because the discord parameter on the streamkit
doesn't seem to be taken into account correctly */
.name { display: none; }

/* Default avatar */
.avatar {
    content: url("https://link-to-image.png");
}

/* Users go here: */

.avatar[data-reactid*="new"] {
    content: url("https://link-to-image.png");
}
.speaking[data-reactid*="new"] {
    content: url("https://link-to-image.png");
}

The result is an overlay, where the images change went talking in some way:

  • Brightness is increased;
  • The image is bumped 15 pixels higher;
  • The image changes depending if an image is set for talking only.

Thanks to Malidoudou for the output for her streams.

Explaining some parts of the code further

It’s important to understand some parts of the properly before running this code, even though it’s just CSS.

First of all you cannot trust users, I recommend using a default image for users that are not part of the CSS to avoid displaying potentially unwanted profile pictures:

/* Default avatar */
.avatar {
    content:url("https://link-to-image.png");
}

This code will replace the img tag’s content with the provided image for everyone that connects to the voice channel. After that it will be possible to set below the specific users with their IDs:

.avatar[data-reactid*="user discord id"] {
    content:url("https://link-to-image.png");
}
.speaking[data-reactid*="user discord id"] {
    content:url("https://link-to-image.png");
}

When we override .avatar we are already setting the default image for the user, by specifying that the attribute data-reactid contains a certain string we can refine our selector and make it target a specific user ID (since they are unique).

In this case the same applies when .speaking is added to the user .avatar.

If you wish to retain round avatar you will need to tweak the border-radius within the first definition of .avatar.

Possible improvements

Since we are dealing with images, animated GIFs are an option and could be used to display an animation with transparency.

If the GIF format doesn’t provide enough colors then it’s possible to fallback to something like the animated WebP or APNG format.

Credits, warranties & notes

This code is based on a generator found on reddit, I’ve changed it to make it work better and fit my own settings. If you modify the code please keep the credit list and add yourself to it.

The code is provided as is and might break one day if the Stream Kit is updated.

This code can be used for son PNG VTubing too.

Separate your audio streams for streaming on Windows

Streaming and recording video games is something I’ve been into, casually, for years (since 2006). Recording gameplay with audio usually includes all the system audio and this can be a problem.

Recording all system audio issue

Windows, your web browser and the game’s audio will play through the default device. That default device is usually your headphones or your speakers.

OBS and ShadowPlay usually record that default device, this is something we’ll have to change.

Virtual Audio Cable

I’m using Virtual Audio Cable (VAC). You can use the trial version, buy it or use an alternative virtual cable driver, this is all up to you.

Open the Virtual Audio Control Panel as an admin (always) and setup the desired number of lines. Each line will be setup to receive audio from certain apps depending on the usage you want.

I have the main line for gameplay, my Discord line to record people I’m talking to. I also have a third line for miscellaneous things and a fourth that I’m not using.
Ideally I would’ve have set one line specifically for gaming, but Windows 10 being what it is (and standards being what they are) it ain’t going to work like that.

To complete the audio setup I also need to output those lines to something and that something is my headphones. Each output line automatically inputs the sound into a virtual input too, that way you can listen to it.

Basically this is how things go:

  • Outputs:
    1. Headphones;
    2. Line 1: Main output (default output device);
    3. Line 2: Discord output;
    4. Line 3: Misc output.
  • Inputs:
    1. USB Microphone (default input device);
    2. Line 1: Main output mirrored as input into my headphone;
    3. Line 2: Discord output mirrored as input into my headphone;
    4. Line 3: Misc output mirrored as input into my headphone.

Windows 10 doesn’t remember

Like I said previously one problem that forces me to set the line 1 as the default output device is because Windows 10 can’t exactly remember correctly which app is outputting on which device.

This issue could also be the other way around where an app will have a different output selected but still output to the default device, I’m not sure why but answers would be appreciated.

OBS recording

OBS is a great piece of software that permits me to merge lines and split some too! This is perfect for recording gameplay and streaming (at the same time).

First we need to specify that we will be recording several tracks into our ouput in OBS, for that we need to go into the settings: File, then Settings.
From there we go into the Output section and select in Streaming the first audio track as the one we will be using for streaming like so:

As a bonus you can also use a different audio track for the VOD so you can have avoid having Spotify playing in the VOD (and avoid the DMCA).

In recording we need to tick all audio track to enable all audio tracksfor later:

Then of course we need to name them and change the audio bitrate if you desire:

In my case I have everything playing on track 1 since it is the default track.
Track 2 will contain the game audio or the main subject of the video/stream.
Track 3 is my voice, followed by track 4 with voices from Discord.

Having different tracks enables me to control what is output when I record and stream, this way I’m able to make audio commentary when preparing a video and after that replace that commentary with a carefully recorded one, while keeping the gameplay audio without altering it.

To select where what track plays it’s necessary to go into the Edit menu, then Advanced audio properties. Set the different inputs and outputs as you wish in the new window:

Keep the first track checked for all lines, check the other numbers as you need.

Troubleshooting: static/glitch audio

After a while if the computer is not rebooted for days it might happen that the audio fizzles, glitches or becomes static. This isn’t a good experience.

The fix consists in restarting Virtual Audio Cable or the audio service from the control panel (as an admin).

Going further with FFMpeg

This is my follow up to getting started with FFmpeg. I strongly recommend getting to know the tool better in my previous post about it.

Concatenate

Multiple clips can be merged together with the concat demuxer. The idea is to create a text file with a list of files to concatenate together (in order), the format is as follows:

# List of files in order
file './file1.mp4'
file './file2.mp4'
file './file3.mp4'

For the lazy people like me it’s possible to use shell scripting to generate this list:

for f in ./*.mp4; do
  echo "file '$f'" >> list.txt
done

Then you need to feed the file as an input and specify the format (-f) as concat:

ffmpeg -f concat -i list.txt -c copy output.mp4

The wiki page speaks more in detail about this feature.

Extracting the frames

It is quite simple to extract all the frames from a video as pictures.

ffmpeg -i input.mp4 frame_%03d.png

In this command we extract every frame from input.mp4 as PNG pictures. We use the printf format for the numbering of the frame (we pad with 0 the %d for 3 characters).

It’s possible to use the parameters for the start and length of the clip to extract part of the frames or just simply limit number of frames to extract with -vframes. We can also specify a different framerate to work with during this process with -vf fps=1.

Hardware acceleration encoding

For maximum speed it is possible to use a hardware encoder for H264, I will only cover how to do this with an NVidia GPU (NVENC).

First check that FFmpeg has not been configured with --disable-nvenc, this will appear in the banner when running FFmpeg if NVENC is disabled.

ffmpeg -ss 14:01 -i "input.mp4" \
  -c:v h264_nvenc               \
  -b:v 60000k                   \
  -t 0:30
  output.mp4

This looks exactly as encoding, except the codec on line 2 is different, it has _nvenc appended to it. This is really simple and will boost the encoding drastically.

Reading more

Please check out the following pages if you wish to know more: