Fix ethernet interface following ASRock B450M-HDV’s UEFI update on Linux

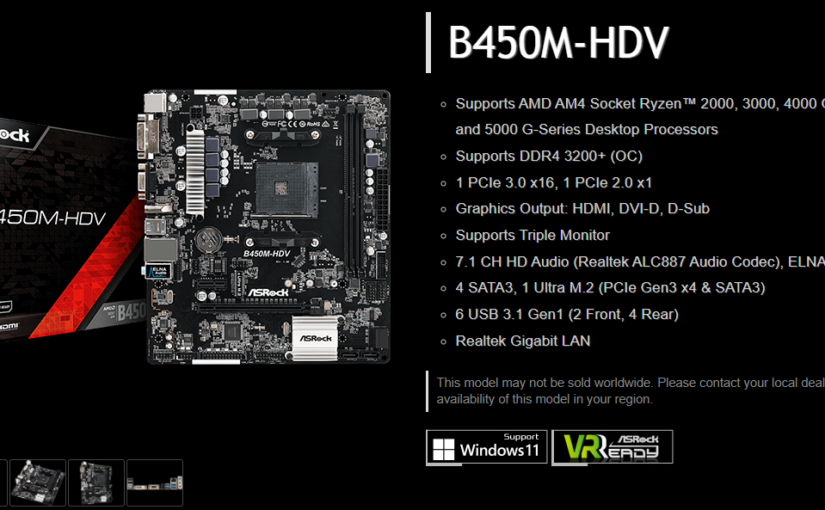
I own an ASRock B450M-HDV for my home server, it was cheap. It’s currently paired with a Ryzen 3 2200G, but will be getting a Ryzen 5 5600G very quickly.

But to get a more recent CPU I need to update my UEFI from version 1.20 to 4.40. This is great because this means that my home server built cheap can properly evolve and extend its lifespan by a bit.

Symptom

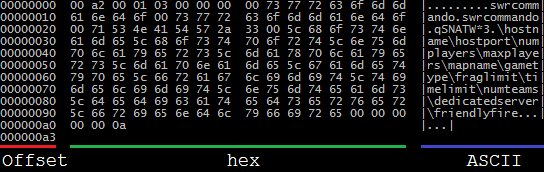
After an UEFI update I always login and attempt to ping 8.8.8.8 but it wouldn’t reach.

No entry for the NIC exists within the UEFI but it is detected:

senpaisilver:~$ sudo lshw -C network
  *-network
       description: Ethernet interface
       product: RTL8111/8168/8411 PCI Express Gigabit Ethernet Controller
       vendor: Realtek Semiconductor Co., Ltd.
       physical id: 0
       bus info: pci@0000:07:00.0
       logical name: enp7s0
       version: 15
       serial: 01:23:45:67:89:AB
       size: 1Gbit/s
       capacity: 1Gbit/s
       width: 64 bits
       clock: 33MHz
       capabilities: pm msi pciexpress msix bus_master cap_list ethernet physical tp mii 10bt 10bt-fd 100bt 100bt-fd 1000bt-fd autonegotiation
       configuration: autonegotiation=on broadcast=yes driver=r8169 duplex=full firmware=rtl8168h-2_0.0.2 02/26/15 ip=192.168.1.3 latency=0 link=yes multicast=yes port=MII speed=1Gbit/s
       resources: irq:36 ioport:f000(size=256) memory:fcd04000-fcd04fff memory:fcd00000-fcd03fff

Resolving the solution

This is a walk in the part, when querying the NICs I need to get the logical name:

senpaisilver:~$ sudo lshw -C network | grep "logical name:"
logical name: enp7s0

In my case I’m interested in the enp7s0, this will be the string I will have to update in my netplan. In my case there’s only one netplan /etc/netplan/ which is 50-cloud-init.yaml (may differ on other installations).

In that file we need to copy the logical name in the ethernets section like so:

network:
    ethernets:
        enp7s0:
            dhcp4: true
    version: 2

Save and then run the following commands to enable the new netplan:

sudo netplan generate
sudo netplan apply

If everything works you should be able to reach the internet, otherwise try rebooting.

Why update the CPU?

I’m been having issues with slow encoding and to be honest the Ryzen 3 2200G was a low cost way of getting started, I need more power and I’ll probably update the SSD to a proper NVMe PCI-E 3.0 one if the need arises.

But by the end of the day I need more CPU performance and I’ll be need more RAM too for a PhotoPrism instance too. Maybe it would be a great moment to properly setup a Grafana dashboard too since I already have most of the docker compose file ready.

So much to do… So much to do…

Update 2022/01/08

I received the Ryzen 5 5600G and proceeded to install it, after working for a few minutes the screen would turn off and sleep. The reset and power buttons wouldn’t register at all, the ethernet would cut off meaning I had no other option than to pull the plug (or use the PSU’s switch).

Continue reading Fix ethernet interface following ASRock B450M-HDV’s UEFI update on Linux

Formatting hexdump’s output

hexdump is a tool used to dump a file (or whatever is piped to it) as a hex file. I personnally like using it with the “canonical” (hex + ASCII) options like this:

https://gist.github.com/SenpaiSilver/84f1f755ee3cc426ad503f856ee81351

While reading the man I saw I could specify a format (-e) or a format file (-f) to change the output. Great!
I can actually control what I want to see.

Understanding the output

A format file is just like your regular file. We will now try to recreate the “canonical” output. First of all we need to analyse what output provides and how:

hexdump -C Made_in_paint_with_love

We can see that there are 3 sections:

  • Offset;
  • Hex data;
  • ASCII data.

The Offset is 8 characters wide, the hex data is 48 characters wide and the ASCII data is 16 characters wide or 18 characters wide with the separators. Each section is separated by a set of two spaces, same goes for the hex data that is separated in half.

The number of leading zeros in the offset is 8, and in the hex data is 2.
This is particularly important so we can get the padding right.

Creating the format file

Use your favorite text editor and/or operating system. I won’t judge you.
The best way to reproduce the same output is to use the same input, so start writing your favorites quotes from your favorite shows.
I’ll be using some data I got from sniffing Republic Commando‘s sockets.

It’s good to be familiar with the printf formatting values.

The first element we need to show is the offset which can be achieved by using the magic value _ax. Values that are printed must be surrounded by quotes. Since we are printing hex numbers in the hex section we will use 02h so that we have a hex number that will always be 2 characters long, even if it’s null.
For the ASCII section we will use _p.

https://gist.github.com/SenpaiSilver/1b22768ccaca7bb1dbd6dd8ed7b93415

Close enough. The offset needs leading zeros. Let’s put 8 leading zeroes like for the hex variable. Let’s also adjust the padding on the ASCII section.

https://gist.github.com/SenpaiSilver/feec6274663338d82a8cea0b2174579a

That’s very close. But we don’t have the last line from the “canonical” output, the _Ax value. And we’re missing the padding cutting the hex data in half. To cut data in half we can print each half separately.

https://gist.github.com/SenpaiSilver/f0af132b6f85cf910654ffd074ea7ef6

That’s it!

Going further

There is not much to say. This is what the “canonical” output prints. The hardest part was probably understanding how to use the buffer.

https://gist.github.com/SenpaiSilver/7738556f3552505a48f89eb466bcf6c3

This is the final format file. Instead of using hard-coded padding it is possible to specify the padding before the leading zeros as such: "%3.02x" will be equivalent to " %02x".

We are also printing each byte by specifying 8/1 wich translates to print the next 8 values as groups of 1 byte. By writing 8/2 you are grouping the 16 next values, grouping them by 2 and printing each group.
This is manipulating the input as blocks of arbitrary length.

Named pipes for debugging

UPDATE 2021/03/04: After reviewing some posts (like this one) I’ve come to the conclusion that this is a pretty dumb idea but I will keep it up because there’s no need to hide it.

During a project for school, I came across the worst problem I could ever have: not having tools to debug.

I had to write a program that would be executed by a PHP script in command line, I decided to write the program in C++.
The program was supposed to receive parameters on STDIN:

  • Money you start with;
  • Number of cycles;
  • Loop: number.

The STDOUT and STDERR was thrown into a pipe to be used by the PHP script, so I couldn’t write in the console any calculation I need to check.
The only way to get an output was to write somewhere else than on the STDOUT and STDERR.

Writing to files

I thought about writing my debugging output into a file, but then I encountered a problem: what if I get an infinite loop ?
I could kill the program.

Writing to files wasn’t really helping with real-time debugging.
And I could easily fill my hard-drive

Writing to a named pipe

Named pipes are the best for real-time debugging !
I could nearly make tea and pour it into a cup.

Since I was running Fedora 18, I could use named pipes so I decided to give it a try, I wrote a simple script:

#!/bin/sh

if [ -e "./debug.pipe" ]
then
        rm -f "./debug.pipe"
fi

mkfifo "./debug.pipe"
while (cat "./debug.pipe")
do
        cat "./debug.pipe"
done

I then needed to write the debugging data directly into the pipe like if I was writing a normal file.

Ubuntu setup process crash

Like I always say, Ubuntu was great when you wanted to get started with Linux when the only OS you used was Windows.
If today you want to try Ubuntu, you can start with a live CD or you can install it next to Windows, but what happens if the setup process fails ?
Ubuntu goes into an infinite loop if your username has and underscore character (_), it’s been more than two years and the problem still exists !

There is also another problem, on an old computer I tried to install Xubuntu, the setup process crashed without displaying a message because the slideshow wouldn’t work.
I had to uninstall “ubiquity-slideshow-xubuntu” on the Live CD with this command:
[code language=”bash”]
sudo apt-get remove ubiquity-slideshow-xubuntu
[/code]
Installing Ubuntu has become random, and I really hope that in the future we won’t have to deal with unrecoverable errors.