Update 2023/05/03
Use Reactive.Fugi.Tech instead, it’s easier. You can setup your profile pictures and share a link to be integrated into OBS. It just works.
Original post
When building your streaming overlay you might want to add the other users that are in your current vocal chat but you want to customize a bit the way it’s displayed.
Discord doesn’t offer any of those options natively but with OBS Studio it’s possible to use some tricks.
CSS & web knowledge required to understand how to use CSS and how to link images.
Setting up the widget
Nothing really hard here, got to the Stream Kit page for Discord in the overlay section.
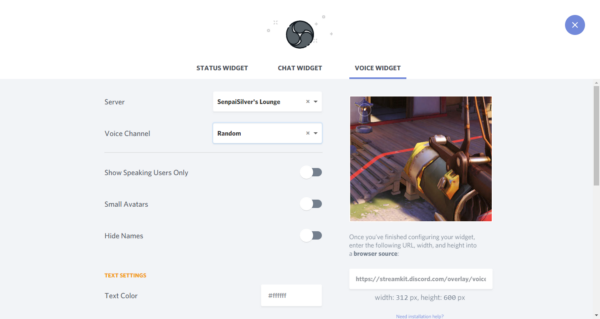
Setting up the server and the voice channel to be used will alter the URL so make sure you are using the right channel, but it’s possible to use a personal and private channel to use for PNG VTubing.
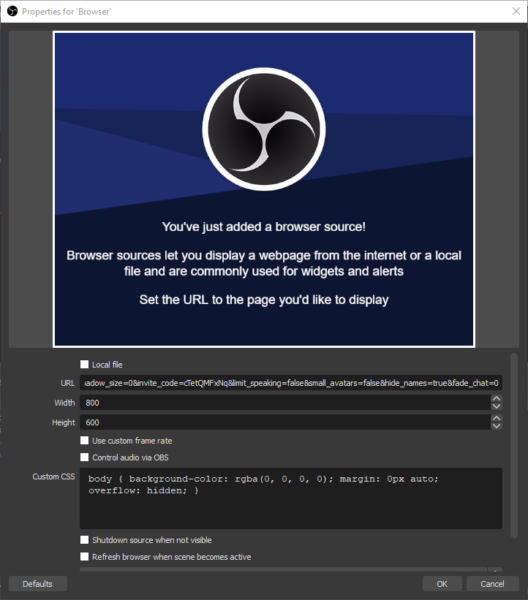
In OBS within your scene you need to create a browser source and use the provided link as such (no preview until it’s saved):
This is the basic setup. Next we will need a way to get the user ID on Discord.
Setting up Discord
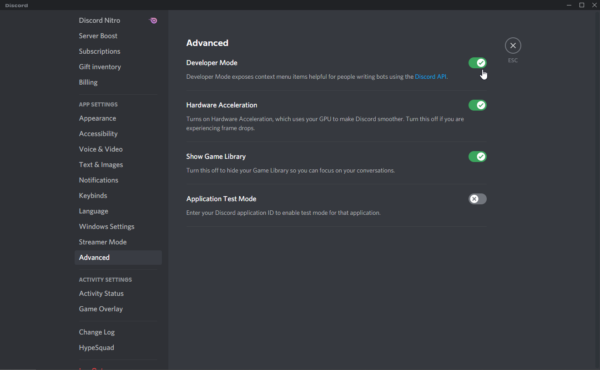
To be able to get the user IDs we need to enable the developer options within Discord. Go to your settings within Discord and in the advanced tab you’ll find the developer toggle:
Getting the user’s ID is as simple as right clicking a name in the chat and clicking on the Copy ID button:

Customizing the widget
Since the widget is a web page within a web view in OBS Studio it’s easy to customize through CSS. Here’s the code to copied & pasted into the custom CSS text area in the browser source:
/*
To be used with the Voice Widget from the Discord Stream Kit
https://streamkit.discord.com/overlay

Do not hotlink images, please rehost them to avoid stealing
bandwidth and keep control over your images, Imgur is a fine
option for this.

Credits:
- Generator by kukushie: https://www.reddit.com/r/VirtualYoutubers/comments/k4q8jw/css_generator_for_discord_reactionary_images_that/
- Edited & improved by SenpaiSilver: https://twitter.com/SenpaiSilver

Please keep the credit chain when making & publishing your changes.
*/

@keyframes speak-now {
    0%  { bottom:0px; }
    15% { bottom:15px; }
    30% { bottom:0px; }
}

body {
    background-color: rgba(0, 0, 0, 0);
    margin: 0px auto;
    overflow: hidden;
}

/* Aligning everything on the same line */
.voice-state {
    display: inline-block;
}

/* Images must be square, change height for it to be scaled
back to 128px wide, or else deal with bad alignments */
.avatar {
    height: 128px !important;
    width: auto !important;
    border-radius: 0% !important;
    filter: brightness(50%);
}

.speaking {
    border-color: rgba(0,0,0,0) !important;
    position: relative;
    animation-name: speak-now;
    animation-duration: 1s;
    animation-fill-mode: forwards;
    filter: brightness(100%);
}

/* Hiding names because the discord parameter on the streamkit
doesn't seem to be taken into account correctly */
.name { display: none; }

/* Default avatar */
.avatar {
    content: url("https://link-to-image.png");
}

/* Users go here: */

.avatar[data-reactid*="new"] {
    content: url("https://link-to-image.png");
}
.speaking[data-reactid*="new"] {
    content: url("https://link-to-image.png");
}
The result is an overlay, where the images change went talking in some way:
- Brightness is increased;
- The image is bumped 15 pixels higher;
- The image changes depending if an image is set for talking only.
Explaining some parts of the code further
It’s important to understand some parts of the properly before running this code, even though it’s just CSS.
First of all you cannot trust users, I recommend using a default image for users that are not part of the CSS to avoid displaying potentially unwanted profile pictures:
/* Default avatar */
.avatar {
    content:url("https://link-to-image.png");
}
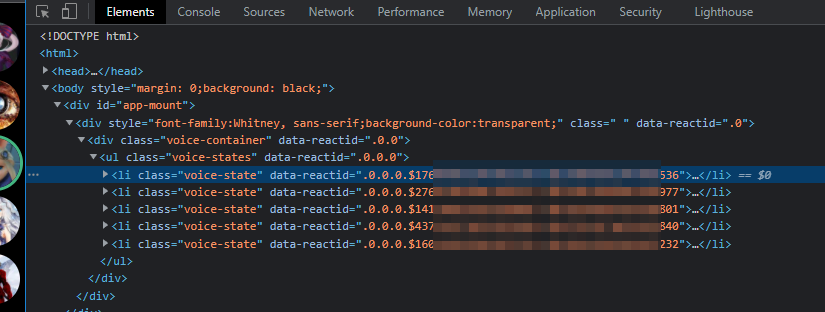
This code will replace the img tag’s content with the provided image for everyone that connects to the voice channel. After that it will be possible to set below the specific users with their IDs:
.avatar[data-reactid*="user discord id"] {
    content:url("https://link-to-image.png");
}
.speaking[data-reactid*="user discord id"] {
    content:url("https://link-to-image.png");
}
When we override .avatar we are already setting the default image for the user, by specifying that the attribute data-reactid contains a certain string we can refine our selector and make it target a specific user ID (since they are unique).
In this case the same applies when .speaking is added to the user .avatar.
If you wish to retain round avatar you will need to tweak the border-radius within the first definition of .avatar.
Possible improvements
Since we are dealing with images, animated GIFs are an option and could be used to display an animation with transparency.
If the GIF format doesn’t provide enough colors then it’s possible to fallback to something like the animated WebP or APNG format.
Credits, warranties & notes
This code is based on a generator found on reddit, I’ve changed it to make it work better and fit my own settings. If you modify the code please keep the credit list and add yourself to it.
The code is provided as is and might break one day if the Stream Kit is updated.
This code can be used for son PNG VTubing too.