Streamer.bot is a great piece of software but it comes with some caveats: scripting is tedious. I use Streamer.bot for my own streams and I have enjoyed scripting some events.
This software is missing some pretty important debugging tools and Streamer.bot is not open source. I would have thrown in some of my improvements so I might instead get to writing plugins.
Inspecting all the variables a script can use
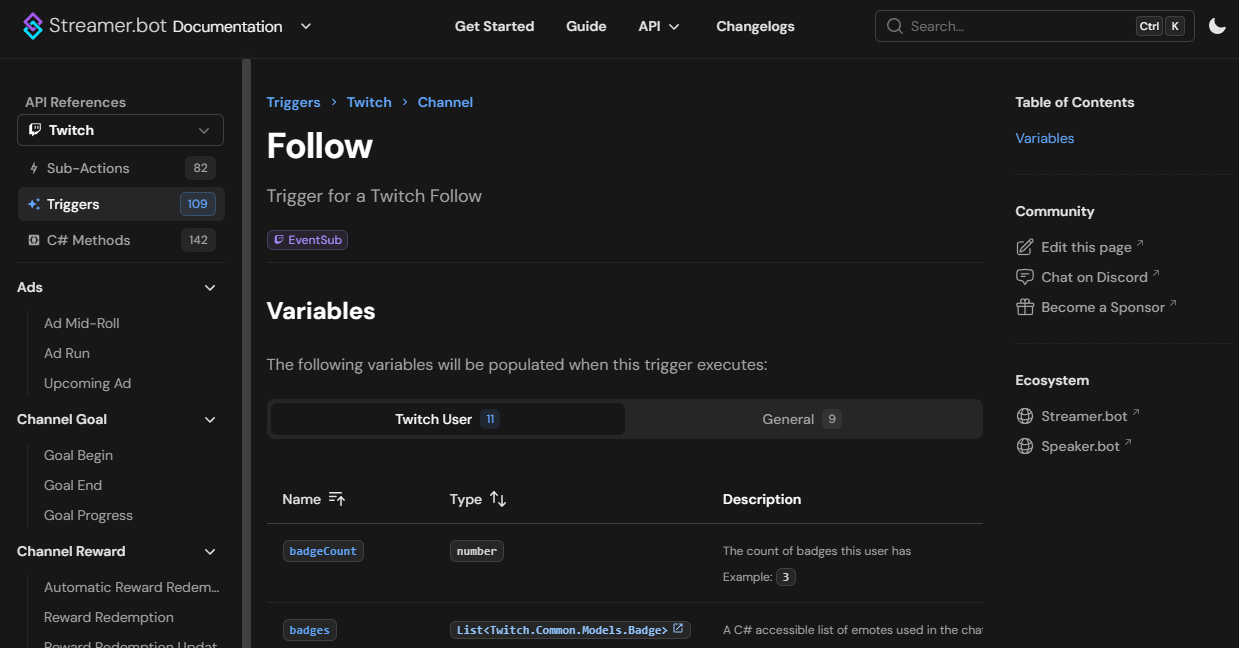
First, what I’m calling variables in this context is not actually variables, the documentation refers to these as arguments. But since I’ll be using them as variables, that have been set by previous actions, I will be referring to them as variables.
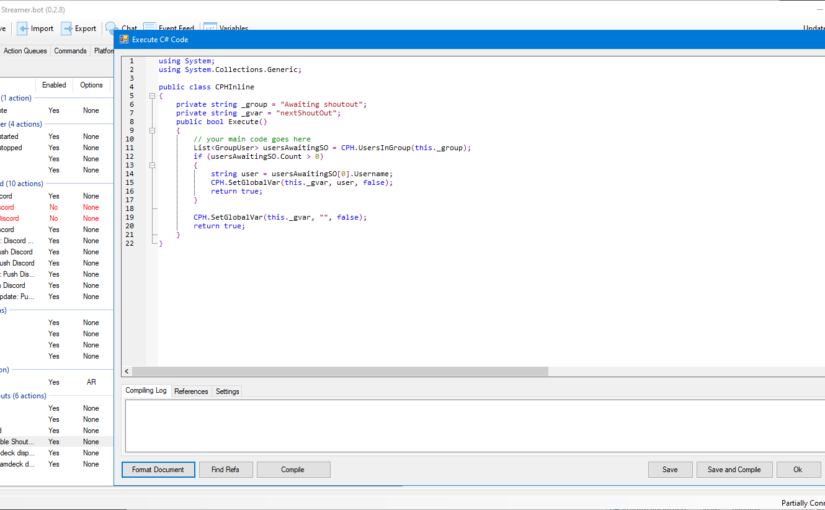
My main issue with C# script in Streamer.bot is that you cannot inspect variables easily. The documentation sometimes is incomplete and doesn’t list the variables that are available to you or sometimes it just displays a blank page.
The great thing about scripting, when you know what you are looking for, is that you can print to the log file whatever information you need:
using System;

public class CPHInline
{
    public bool Execute()
    {
        CPH.LogInfo("LogVars::Start");
        foreach (var arg in args)
        {
            CPH.LogInfo($"LogVars::{arg.Key} = {arg.Value}");
        }
        CPH.LogInfo("LogVars::End");

        return true;
    }
}
The output will look like (some lines were truncated):
You will then be able to access those variables through the TryGetArg function as such:
using System;

public class CPHInline
{
    public bool Execute()
    {
        bool muted = false;
        CPH.TryGetArg<bool>("microphone.muted", out muted);
        if (muted)
        {
            // Do something for a muted mic
        }

        return muted;
    }
}
What Streamer.bot calls arguments can also be somewhat called variables. My opinion is that it can be confusing for those not in the know and I’ve set global variables in places where I didn’t think about using the arguments.
It’s fine because it works, but is it the proper way? No and I should make the switch where appropriate to make things run as they should be.
The big difference is that the triggers will output arguments that can be surround by % to be used such as %username%, while global variables are surrounded by ~ such as ~username~ when you want to use them.
But I still think that arguments should just be called local variables.
Due to the lack of proper up to date documentation and debugging tool it’s tricky to inspect what’s happening in Streamer.bot.
This post was written months ago but I never published it because I stopped producing content. I think it’s only right for this to go out to all of you in case someone might need it.
VNyan is a VTubing software used for animating a 3D model for streaming and content creation. I’ve been using it for the last couple of months because of some of its features such as the nodes system.
Nodes are a way to visually script events based on Twitch, WebSockets or whatever is supported in the app. Lately I’ve been thinking about doing a bit more and giving the possibility to just go wild and queue events such as model swap.
Version 1.2.1b is required, the update introduces a wizard that can be skipped if you already have VNyan setup.
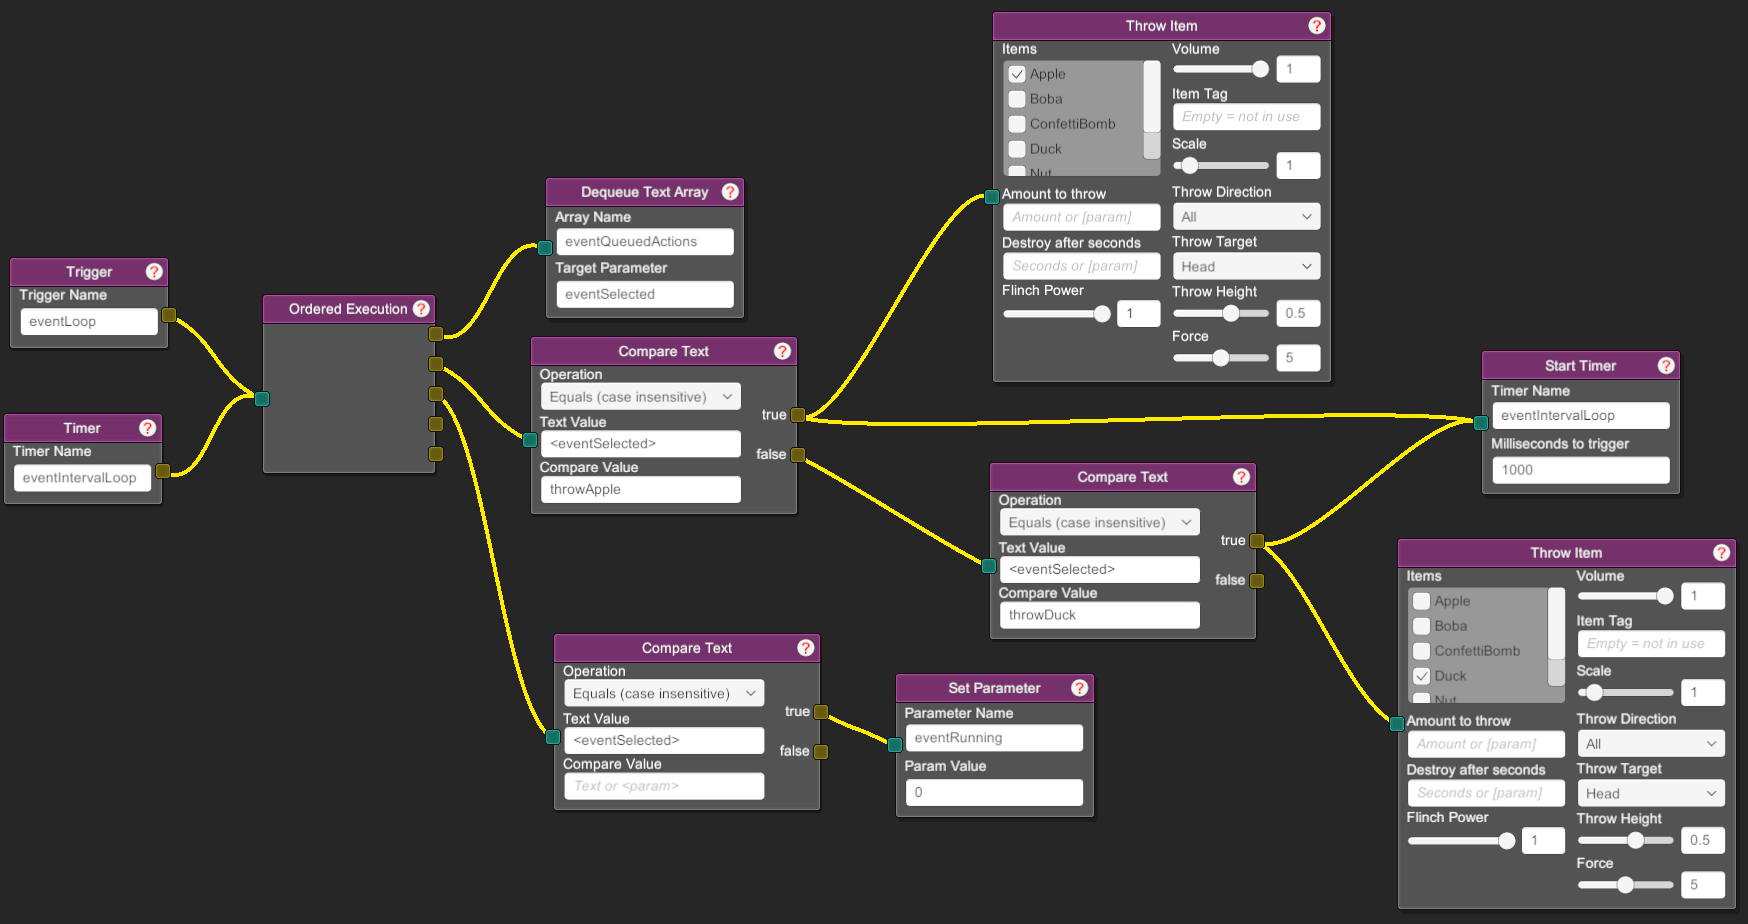
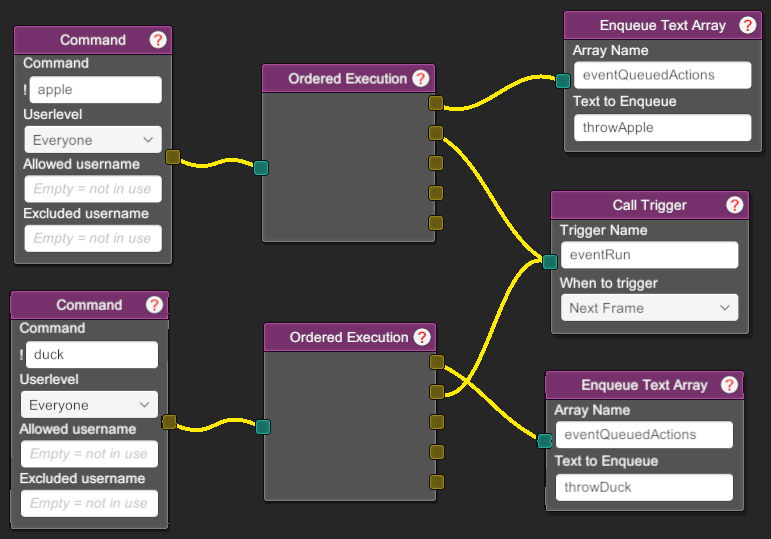
What is a queue?
We want to push items to the end of the array and take items from the top of it.
This is what we call first in first out. It’s the absolute basic idea behind the queueing of events.
The plan
I want to setup commands to do stuff and have them be processed in order with a short delay between each commands. The commands will be normal Twitch chat commands to make things easier.
We will need two things:
An interval timer that will be triggered to run when the queue is not empty;
The event handling that will pop the first element on the top of the queue and run it;
The logic needed to tell when the loop must run and what it is stopped.
In my example I will have two commands:
!throwApple which will throw an apple at me;
!throwDuck which will throw a rubber duck at me.
This can work for doing model swaps but will require a bit more thought and care since you might want to animate that (through effects or transformations) and you will want to take into account the loading delay.
Queuing in VNyan
First of all we need to create the logic that will handle the events, the entry point will be a trigger and it will start a timer that will call that trigger again until the queue is empty.
The events will be handled by conditions that will be checked, if true you’ll apply you action and you’ll delay another call of the event loop. If false you’ll just flag the event queue as finished and not call it again (until another command is called).
Each command will push an element into the queue and it if the event queue isn’t running it will call the event trigger and setup a flag.
It’s important to note that we use the Enqueue Text Array and the Dequeue Text Array.
Prior to this version dequeueing an item was done by using an Ordered Execution node that would get an item from the queue and remove the item by index.
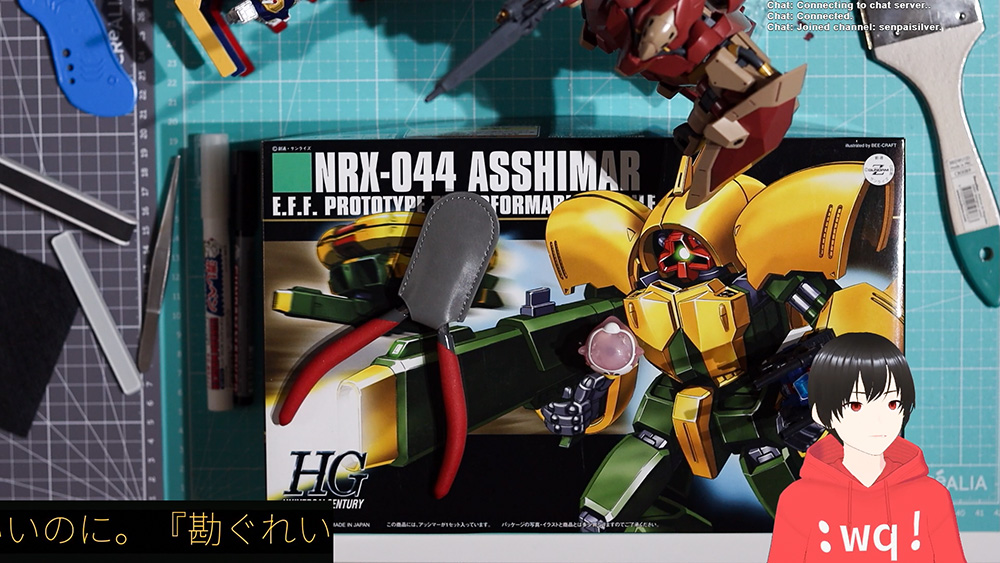
I have a passion an addiction called Gunpla, it’s about building models from the Mobile Suit Gundam franchise which is basically a giant robot franchise. Giant robots are great.
While thinking about how to change a bit my streaming content I thought about the huge 13 boxes of Gunpla I have not built yet and that has been staying unopened for a couple of months. Basically I thought about an excuse to force myself to take time to build.
A passion
I first fell in love with Gunpla back in December 2021 and I have been building until October 2022. I stopped since I had planned to travel to Japan between November and December.
I have currently built over 30 models, mostly from the Mobile Suit Gundam franchise, and while I’m starting to have some pretty crowded shelves I have not intention of stopping.
Call it an addiction if you want.
Mobile Suit Gundam
That one big mecha anime franchise that appears to be really hard to get into until you realize it’s easy. Pick wherever you wanna start and start.
Most series have their own timeline and are standalone such as:
Iron Blooded Orphans;
Mobile Suit Gundam 00;
Mobile Suit Gundam SEED (& SEED Destiny);
Mobile Suit Gundam Wing;
The Witch from Mercury.
The list does go on.
And then some are considered as the main timeline called Universal Century (UC):
Mobile Suit Gundam;
Mobile Suit Gundam Z and ZZ;
Char’s Counterattack;
War in the pocket;
Stardust Memories;
Mobile Suit Gundam Unicorn;
Hathaway’s Flash.
And while this isn’t a complete a list of course you should feel free to pick it up anywhere you like. I started with Hathaway’s Flash and Unicorn, you will probably miss some plot points but whatever gets you started is valid.
For real just pick wherever you wanna start, don’t care about people judging you, care only about getting into it.
Not just models
Gunpla comes from Gundam and Plamo, and Plamo comes from Plastic and Models. The truth is that they are much more than just mere models you look at: they are fun to build and pose.
Unlike Games Workshop’s Warhammer (40K) franchise you get to built you model without needing glue nor paint and the figures can move thanks to over engineering part that just move in the most satisfying way.
I never thought I’d be blown away by how a plastic model can move a legs and feet but I still am to this day. Some models have some very precise movement that actually does improve the movement range beyond what you would expect.
Am I fanboying over plastic models? Yeah I am.
I’d personally recommend to built the RG Nu Gundam to whoever got into Gunpla and is looking to try the best model there is to build out there at the time of writing.
Setting up a stream camera
Let’s get into the main subject after presenting the hobby and my addiction.
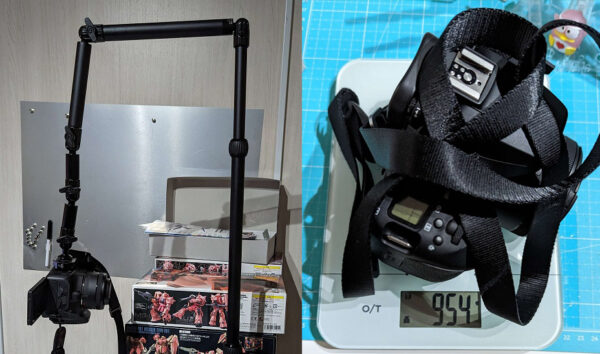
I’m the happy owner of an Avermedia GC551 capture card, a 7 meter long HDMI cable, a Canon 90D and a RØDE VideoMic GO II. This is all you need to get started with showing an image if you know what you are doing.
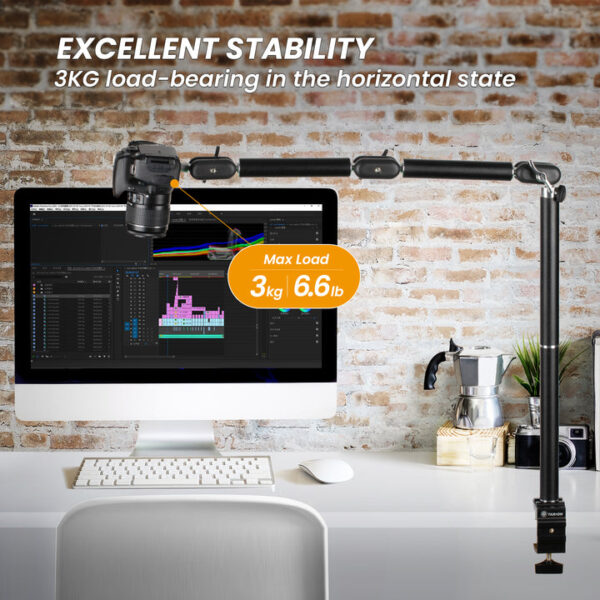
The basic setup I was going for at the beginning was pretty terrible since I was using a tripod on the side but I’ve since then upgraded to Elgato’s Master Mount L and Flex Arm L to hold my camera in an overhead view… And promptly sent it back because the Flex Arm can’t hold a DSLR when it weighs just 1Kg…
Elgato Flex Arm L used with a camera, as seen on Elgato.com
I should have thought about why they don’t specify how much load it can take and some things are surprising…
How it performs with a DSLR (>1kg)
So if the Elgato Flex Arm isn’t an option, what else can I try? Well there’s this Tarion Camera Destop Arm (spelt like that). Am I throwing money to the problem to check what sticks? Yes…
Up to 3Kg should do it right?!
If we take a closer look it’s shorter, with the vertical pole being only 52cm long compared to the Elgato one going up to 128cm. Is it going to be an issue?
If I’m using my Canon EF 50mm f/1.8 STM Lens I need at least 1 meter of distance between the lens and the table to properly record the surface. Buying a 35mm lens would help but it would increase the cost too much for it to be worth right now.
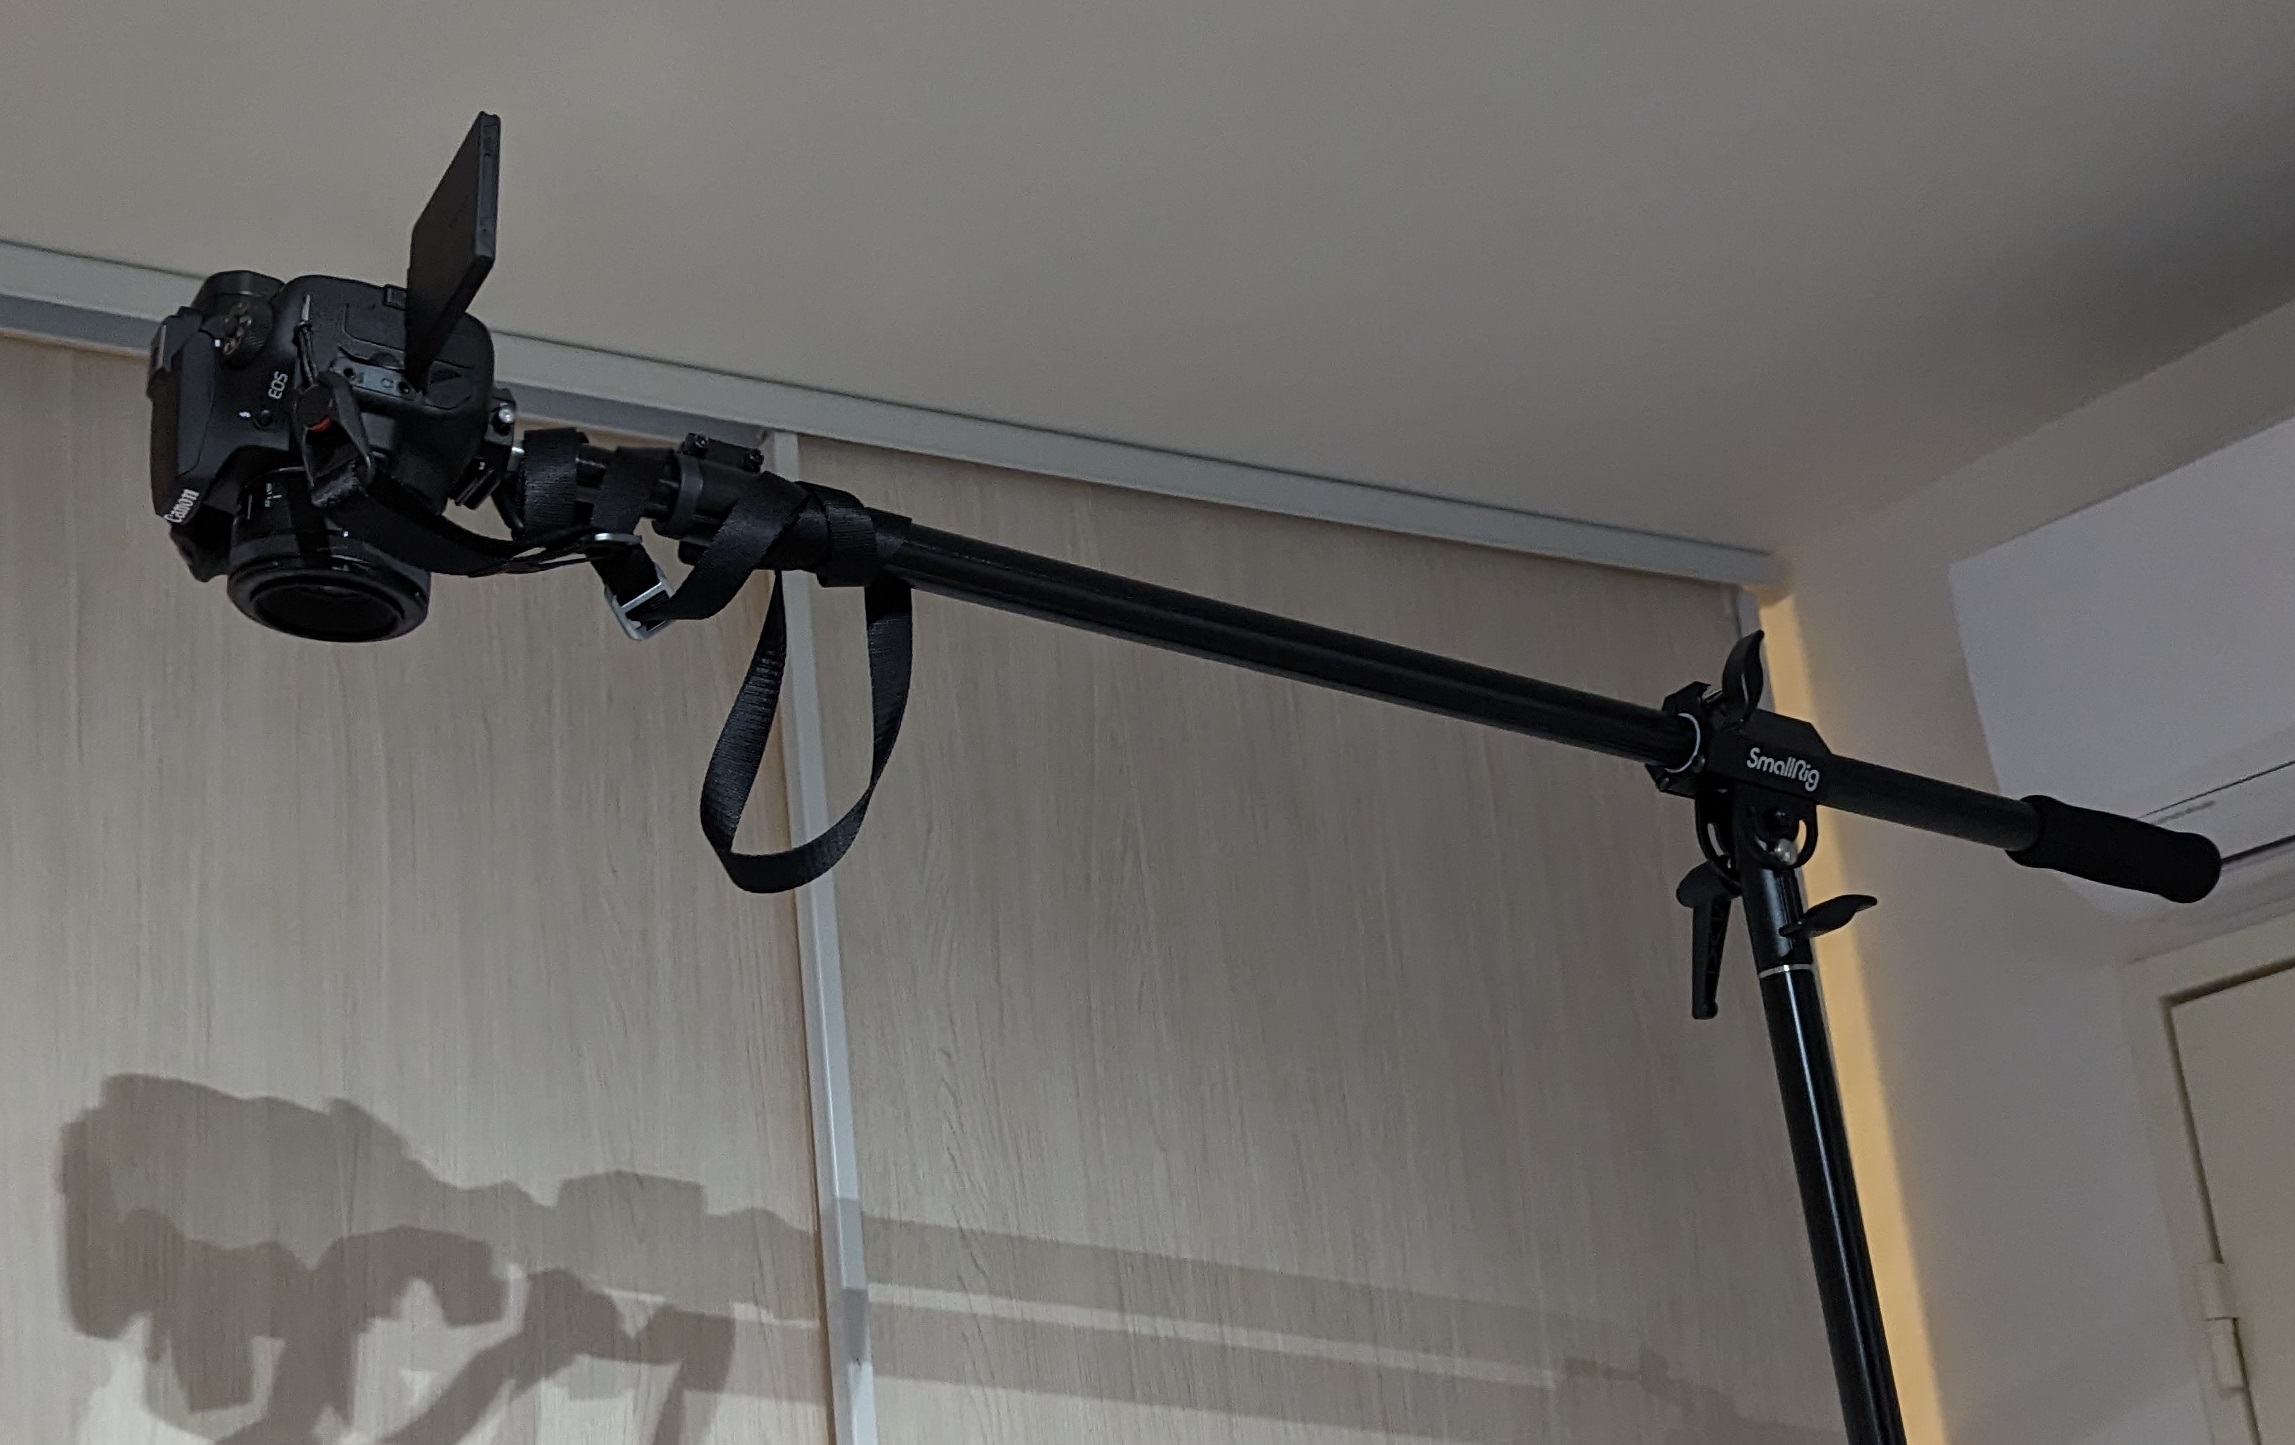
After fiddling a bit with it I’m able to clear the distance and find out that I was wrong: I need more than 1 meter of clearance. So now I’m looking at the SmallRig RA-S280A Air-cushioned Light Stand with Arm 3737, it’s called a light stand but it will be perfect for the camera.
SmallRig can take this DSLR
I can also use a counterweight on the handle thanks to a very handy screw in hook and what it looks like from the point of view of the stream ?
It’s perfect for what I need.
What’s next?
Next up is setting up a microphone and an iPhone 11 to capture my voice and facial expressions. Let’s do a combo.
The GoPro Hero 11 with the 3-Way Tripod is used as a webcam to complete the body tracking and needs to be facing me.
Adding iPhone facetracking, with webcam body tracking ?
Oh yeah, because I’m not streaming in front of my desktop BEEF PC I need to connect a camera to track my body… My laptop is a MacBook Pro M1 Pro, I’m lucking that I can connect my GoPro as a webcam (as it need to be centered) and I can run OpenSeeFace, the facetracking backend for VSeeFace.
OpenSeeFace requires Python 3, I tried using Python 3.10 but one dependency doesn’t seem to exist for my MacBook, so I’ve opted for Python 3.9 and used the following commands to install and run:
# Clone or download the zip
git clone git@github.com:emilianavt/OpenSeeFace.git
cd OpenSeeFace

# Install the latest Python version & pew for easy venv
brew install python@3.9
pip install pew

# Create an environment for the appropriate Python version
pew new openseeface -p3.9
# Or run you venv
pew workon openseeface

# Install dependencies
pip install onnxruntime opencv-python pillow numpy

# Run facetracker.py
python facetracker.py -c 2 -F 30 -W 1920 -H 1080 \
    --model 4 --gaze-tracking 1 --discard-after 0 \
    --scan-every 0 --no-3d-adapt 1 --max-feature-updates 900 \
    --log-output output.log --max-feature-updates 900 \
    --ip 192.<the_computer_with_vseeface> -p 11573
Now to explain how to select the camera:
Parameter -c is for selecting the number associated with the camera;
Parameter -F is for the framerate of the camera;
Parameters -W and -H are for the camera resolution;
Parameter --model improves accuracy, I don’t know why I was able to go with 4 but this is the command line I got from VSeeFace running on Windows and it ran on Mac OS.
Sadly, without running the OpenSeeFace scripts on PC you will have to guess the camera number, frame rate and resolution… Yeah that’s how those things work when there’s no support for Linux and Mac.
My time to shine with a pull request, I should look into that.
For the iPhone I’m running iFacialMocap and this is all you need for your facial expressions, but do setup blendshapes for your model and face, this post isn’t about this.
I only use iFacialMocap and skip the webcam for body tracking, this makes the setup easier but I still wanted to write up all that in case I change my mind.
Conclusion
I didn’t cover the VTubing aspect of it because it’s out the scope of the video but I’ll have to write a post about some of that and explain my setup since my desktop computer is used for streaming but I’m not building anything on my desk.
I need to improve the lighting and maybe do some color calibration for streaming a better image quality.
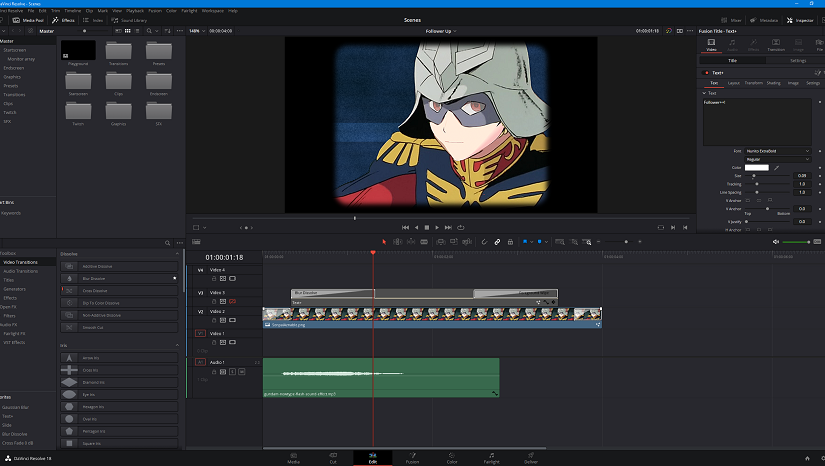
A great alternative to the Adobe video editing suite is Davinci Resolve because it’s free (paid version exists, locks just a bit of features).
Exporting in Davinci Resolve
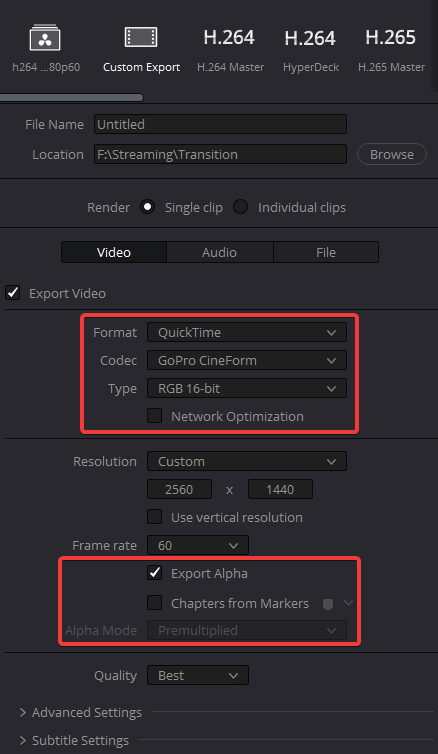
Let’s say you have a timeline with your elements places and transparency set. You will now go to the deliver tab, select Quicktime as the format and GoPro Cineform as the codec.
The most important thing is to select RGB-16 in the type and tick export Alpha.
This is the final step unless you need to publish the file as a WebM.
Convert the MOV to WEBM
When building alerts and overlays, certain services like StreamElements won’t accept the Quicktime file, you will need to convert it to a WebM with the VP9 codec to retain the transparency.
Keep in my you can change the bitrate and increase it by tweaking the value following -b:v.
Conclusion
This small trick is something I spent a long time looking for and I have had mixed results with it. But lately I’ve been getting into preparing custom alerts on StreamElements for my own streams and I was hoping to add something nice.
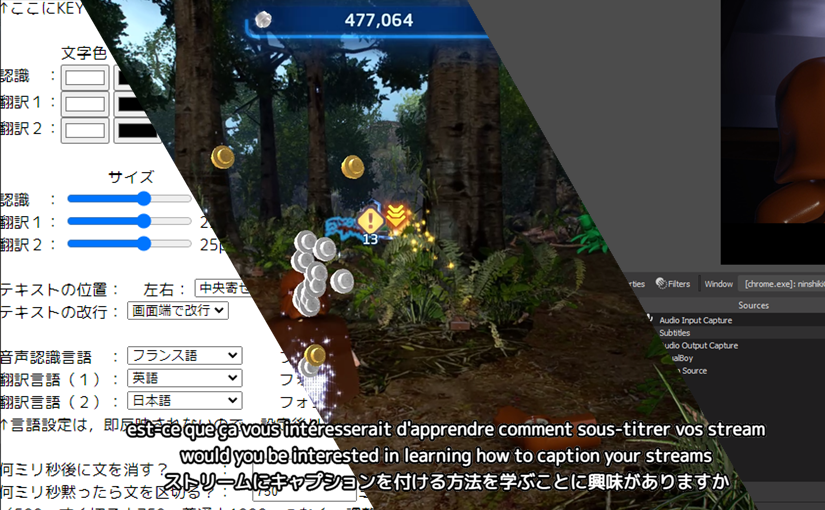
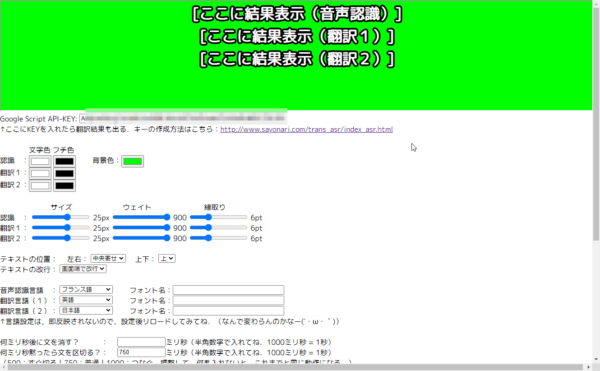
Ever wanted to subtitle your stream in your language and add one or two other languages with automatic translation? Looks like there’s a tool for that.
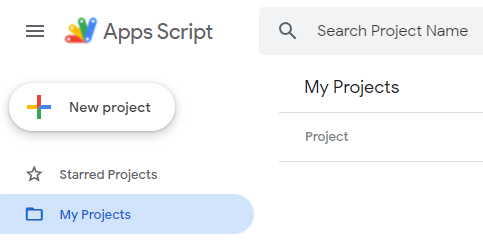
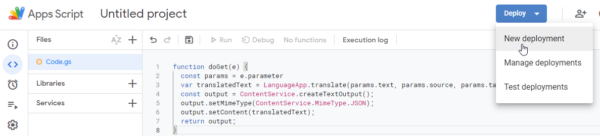
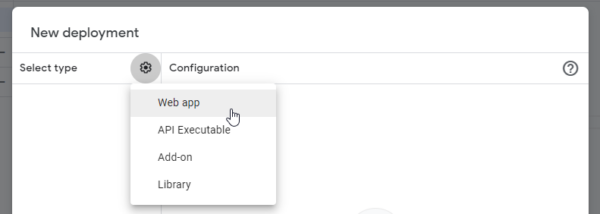
Step 1: Setting up a Apps Script (Google)
Setting up the Apps Script start with creating a new script on Apps Script: https://script.google.com
In the editor you will need to paste the following code:
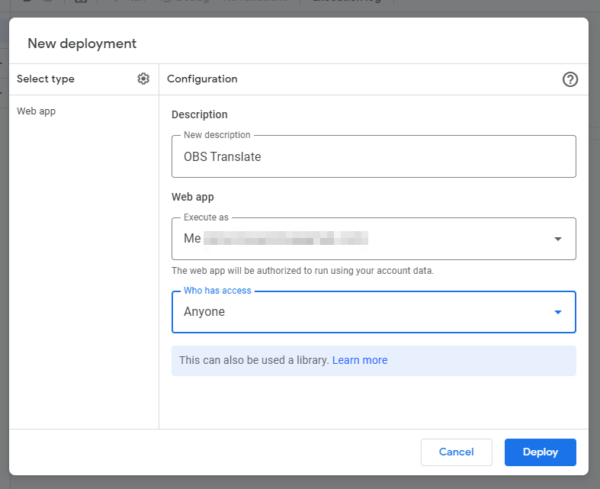
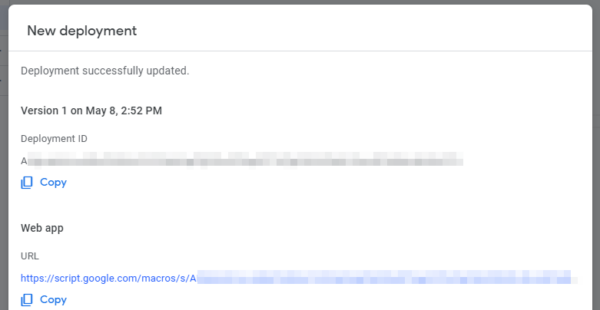
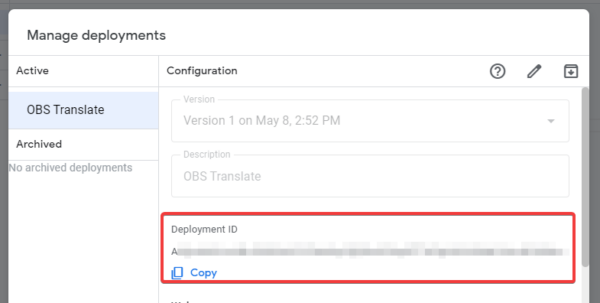
In the input field for Google Script API-KEY paste the one from your Apps Script. If you didn’t copy the key in the previous step you can retrieve if by going into the editor, in the deploy menu you need to click on manage deployments and you’ll find it under deployment ID:
Change the languages you want to use lower on the page, feel free to use Google Translate to find out what is what:
On the bottom of the page you will find the URL that you can copy and paste in your web browser, Google Chrome might be the only supported browser at the time of writting.
Step 3: Setting up OBS
Now comes the less fun part. Since the web page needs to listen to your voice you will have to run the page in your own Google Chrome instance, I’m unsure if it works on other browser since I wasn’t able to make the web app perform every single time.
To set it up all you need is a window capture and some filters. If the content of the web browser doesn’t appear you might need to disable hardware acceleration.
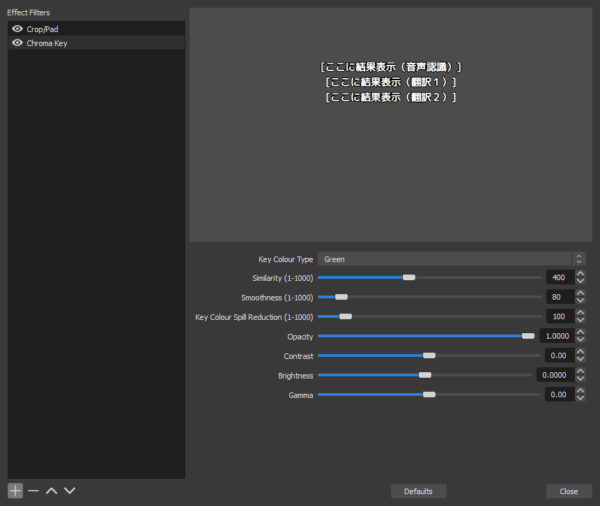
For the filters I usually just crop the top and a bit of the bottom, then I apply a chroma key filter to remove the screen background:
Congratulations, you are know streaming while subtitling at the same time. Subs are the way to go and this is what it looks like:
Troubleshooting
Refreshing the tab might help making the web app work, but if your speech isn’t appearing on screen you should instead try closing and reopening your browser.
I kept the tab loaded before closing Google Chrome and when I opened it again it was working.
Once again this isn’t flawless and some words might appear wrong or be heard wrong, these are the limits of speech recognition. Unless we slap some machine learning over your accent.
It might also strain your performances and require relaunching Google Chrome once in a while.
Turns out streaming gunpla instead of video games helped so much more in getting over 3 average viewers at the same time. People also feeling more engaged and tend to participate much more in chat too.
That was really unexpected but I’m fine with that because I liked streaming my build of the HG Gundam Aerial:
I will definitely do more of that and improve my setup since I have no plans of stopping. I’ll write up a post about the setup once it’s more set in stone.
Original post:
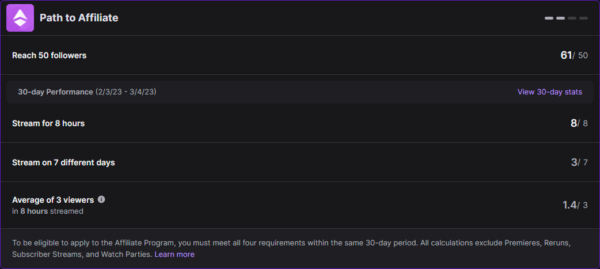
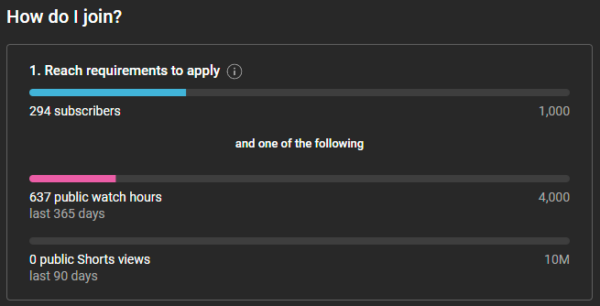
As I’ve announced previously on YouTube and also on the blog I’m trying to get a bit more into streaming. The grind isn’t easy because the path to affiliate has some specific requirements that are actually a bit hard to achieve.
Path to Affiliate
This is what it looks like:
The harder part of it is getting an average of 3 viewers because if I stream towards an audience of no one then I’m just digging down.
I also tend to get much more views on YouTube but more on that later down the post.
Streaming on multiple platforms is forbidden
Once affiliated with Twitch I won’t be able to stream to Twitch and YouTube at the same time. Streaming towards a Restream Docker container was really convenient to automatically upload my VODs to YouTube but it increases the stream latency so much that the interactions are slow.
Once I gain my affiliate status I won’t be streaming to two platforms at the same time.
Streaming on YouTube?
To enable monetisation on YouTube there are different rules:
Getting at least 1k subs is easier than keeping viewers engaged for 4k hours.
I’m thinking of trying something with the public shorts views but that would mean that I need to line up some content and be as widespread as possible.
I could edit some of my VODs on YouTube to extract some highlights but there could be much more work than I’m expecting.
I’m also not very fond of YouTube shorts as I classify that under “infinite scrolling brain dead content for zombie”.
Use Reactive.Fugi.Tech instead, it’s easier. You can setup your profile pictures and share a link to be integrated into OBS. It just works.
Original post
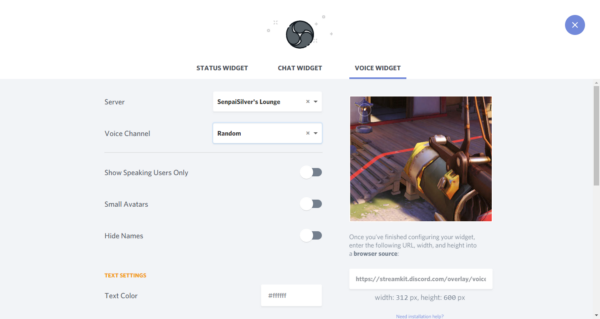
When building your streaming overlay you might want to add the other users that are in your current vocal chat but you want to customize a bit the way it’s displayed.
Discord doesn’t offer any of those options natively but with OBS Studio it’s possible to use some tricks.
CSS & web knowledge required to understand how to use CSS and how to link images.
Setting up the server and the voice channel to be used will alter the URL so make sure you are using the right channel, but it’s possible to use a personal and private channel to use for PNG VTubing.
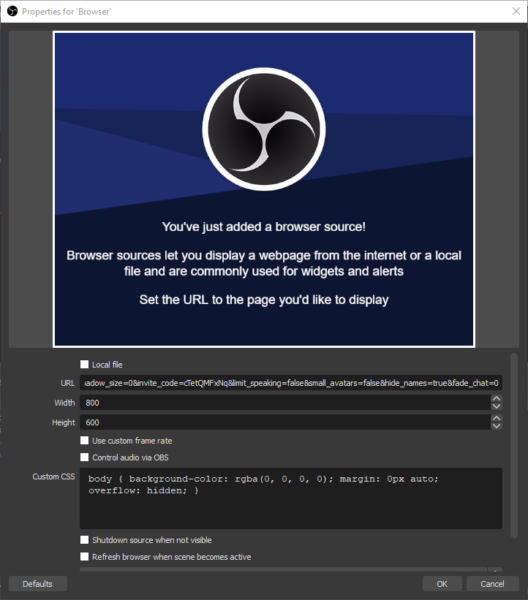
In OBS within your scene you need to create a browser source and use the provided link as such (no preview until it’s saved):
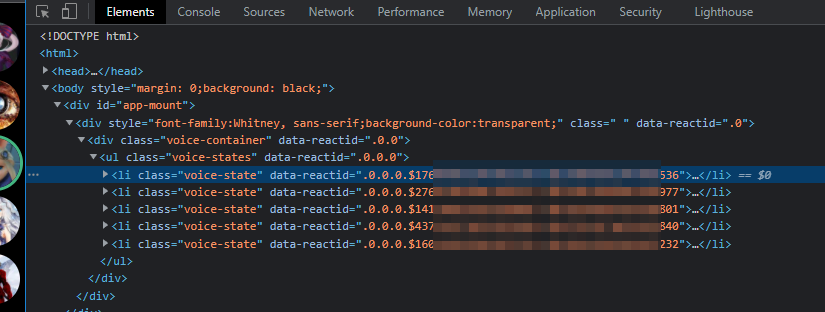
This is the basic setup. Next we will need a way to get the user ID on Discord.
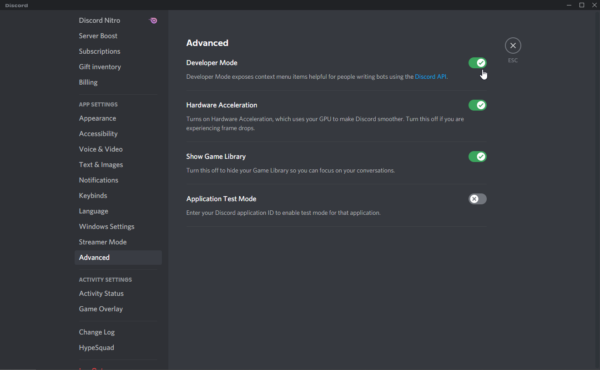
Setting up Discord
To be able to get the user IDs we need to enable the developer options within Discord. Go to your settings within Discord and in the advanced tab you’ll find the developer toggle:
Getting the user’s ID is as simple as right clicking a name in the chat and clicking on the Copy ID button:
Customizing the widget
Since the widget is a web page within a web view in OBS Studio it’s easy to customize through CSS. Here’s the code to copied & pasted into the custom CSS text area in the browser source:
/*
To be used with the Voice Widget from the Discord Stream Kit
https://streamkit.discord.com/overlay

Do not hotlink images, please rehost them to avoid stealing
bandwidth and keep control over your images, Imgur is a fine
option for this.

Credits:
- Generator by kukushie: https://www.reddit.com/r/VirtualYoutubers/comments/k4q8jw/css_generator_for_discord_reactionary_images_that/
- Edited & improved by SenpaiSilver: https://twitter.com/SenpaiSilver

Please keep the credit chain when making & publishing your changes.
*/

@keyframes speak-now {
    0%  { bottom:0px; }
    15% { bottom:15px; }
    30% { bottom:0px; }
}

body {
    background-color: rgba(0, 0, 0, 0);
    margin: 0px auto;
    overflow: hidden;
}

/* Aligning everything on the same line */
.voice-state {
    display: inline-block;
}

/* Images must be square, change height for it to be scaled
back to 128px wide, or else deal with bad alignments */
.avatar {
    height: 128px !important;
    width: auto !important;
    border-radius: 0% !important;
    filter: brightness(50%);
}

.speaking {
    border-color: rgba(0,0,0,0) !important;
    position: relative;
    animation-name: speak-now;
    animation-duration: 1s;
    animation-fill-mode: forwards;
    filter: brightness(100%);
}

/* Hiding names because the discord parameter on the streamkit
doesn't seem to be taken into account correctly */
.name { display: none; }

/* Default avatar */
.avatar {
    content: url("https://link-to-image.png");
}

/* Users go here: */

.avatar[data-reactid*="new"] {
    content: url("https://link-to-image.png");
}
.speaking[data-reactid*="new"] {
    content: url("https://link-to-image.png");
}
The result is an overlay, where the images change went talking in some way:
Brightness is increased;
The image is bumped 15 pixels higher;
The image changes depending if an image is set for talking only.
Explaining some parts of the code further
It’s important to understand some parts of the properly before running this code, even though it’s just CSS.
First of all you cannot trust users, I recommend using a default image for users that are not part of the CSS to avoid displaying potentially unwanted profile pictures:
This code will replace the img tag’s content with the provided image for everyone that connects to the voice channel. After that it will be possible to set below the specific users with their IDs:
When we override .avatar we are already setting the default image for the user, by specifying that the attribute data-reactid contains a certain string we can refine our selector and make it target a specific user ID (since they are unique).
In this case the same applies when .speaking is added to the user .avatar.
If you wish to retain round avatar you will need to tweak the border-radius within the first definition of .avatar.
Possible improvements
Since we are dealing with images, animated GIFs are an option and could be used to display an animation with transparency.
If the GIF format doesn’t provide enough colors then it’s possible to fallback to something like the animated WebP or APNG format.
Credits, warranties & notes
This code is based on a generator found on reddit, I’ve changed it to make it work better and fit my own settings. If you modify the code please keep the credit list and add yourself to it.
The code is provided as is and might break one day if the Stream Kit is updated.
Streaming and recording video games is something I’ve been into, casually, for years (since 2006). Recording gameplay with audio usually includes all the system audio and this can be a problem.
Recording all system audio issue
Windows, your web browser and the game’s audio will play through the default device. That default device is usually your headphones or your speakers.
OBS and ShadowPlay usually record that default device, this is something we’ll have to change.
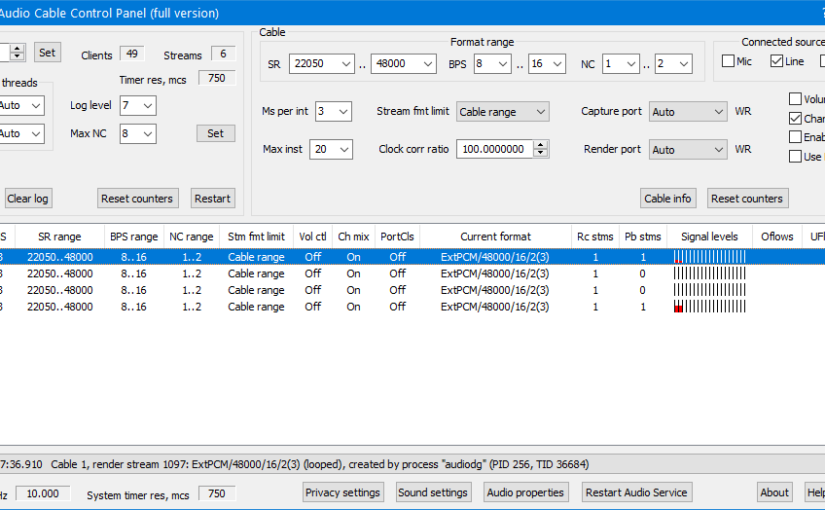
Virtual Audio Cable
I’m using Virtual Audio Cable (VAC). You can use the trial version, buy it or use an alternative virtual cable driver, this is all up to you.
Open the Virtual Audio Control Panel as an admin (always) and setup the desired number of lines. Each line will be setup to receive audio from certain apps depending on the usage you want.
I have the main line for gameplay, my Discord line to record people I’m talking to. I also have a third line for miscellaneous things and a fourth that I’m not using.
Ideally I would’ve have set one line specifically for gaming, but Windows 10 being what it is (and standards being what they are) it ain’t going to work like that.
To complete the audio setup I also need to output those lines to something and that something is my headphones. Each output line automatically inputs the sound into a virtual input too, that way you can listen to it.
Basically this is how things go:
Outputs:
Headphones;
Line 1: Main output (default output device);
Line 2: Discord output;
Line 3: Misc output.
Inputs:
USB Microphone (default input device);
Line 1: Main output mirrored as input into my headphone;
Line 2: Discord output mirrored as input into my headphone;
Line 3: Misc output mirrored as input into my headphone.
Windows 10 doesn’t remember
Like I said previously one problem that forces me to set the line 1 as the default output device is because Windows 10 can’t exactly remember correctly which app is outputting on which device.
This issue could also be the other way around where an app will have a different output selected but still output to the default device, I’m not sure why but answers would be appreciated.
OBS recording
OBS is a great piece of software that permits me to merge lines and split some too! This is perfect for recording gameplay and streaming (at the same time).
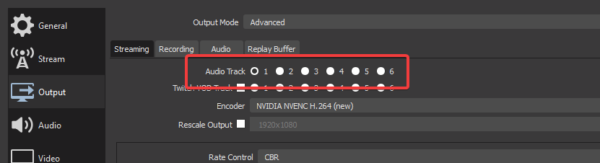
First we need to specify that we will be recording several tracks into our ouput in OBS, for that we need to go into the settings: File, then Settings.
From there we go into the Output section and select in Streaming the first audio track as the one we will be using for streaming like so:
As a bonus you can also use a different audio track for the VOD so you can have avoid having Spotify playing in the VOD (and avoid the DMCA).
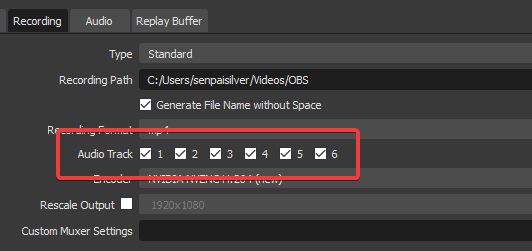
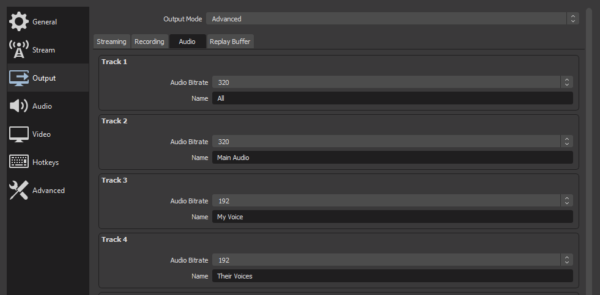
In recording we need to tick all audio track to enable all audio tracksfor later:
Then of course we need to name them and change the audio bitrate if you desire:
In my case I have everything playing on track 1 since it is the default track. Track 2 will contain the game audio or the main subject of the video/stream. Track 3 is my voice, followed by track 4 with voices from Discord.
Having different tracks enables me to control what is output when I record and stream, this way I’m able to make audio commentary when preparing a video and after that replace that commentary with a carefully recorded one, while keeping the gameplay audio without altering it.
To select where what track plays it’s necessary to go into the Edit menu, then Advanced audio properties. Set the different inputs and outputs as you wish in the new window:
Keep the first track checked for all lines, check the other numbers as you need.
Troubleshooting: static/glitch audio
After a while if the computer is not rebooted for days it might happen that the audio fizzles, glitches or becomes static. This isn’t a good experience.
The fix consists in restarting Virtual Audio Cable or the audio service from the control panel (as an admin).