Separate your audio streams for streaming on Windows

Streaming and recording video games is something I’ve been into, casually, for years (since 2006). Recording gameplay with audio usually includes all the system audio and this can be a problem.

Recording all system audio issue

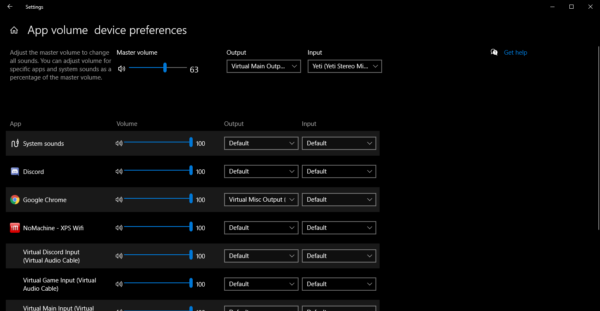
Windows, your web browser and the game’s audio will play through the default device. That default device is usually your headphones or your speakers.

OBS and ShadowPlay usually record that default device, this is something we’ll have to change.

Virtual Audio Cable

I’m using Virtual Audio Cable (VAC). You can use the trial version, buy it or use an alternative virtual cable driver, this is all up to you.

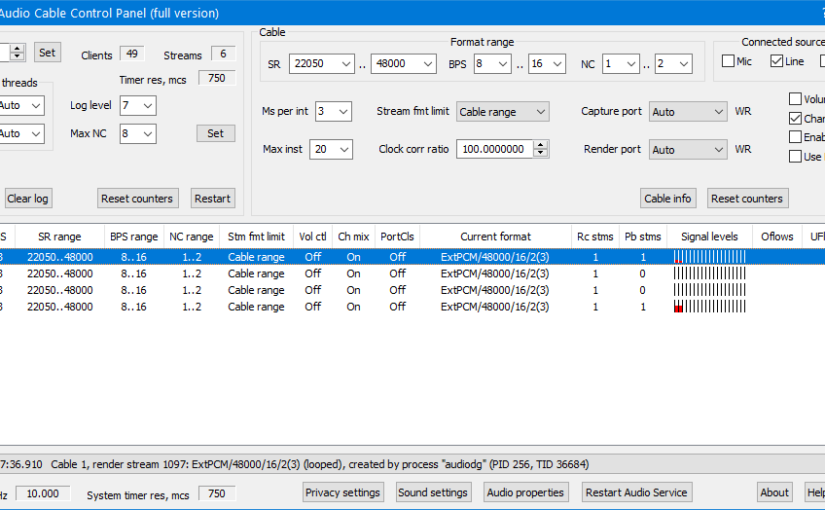
Open the Virtual Audio Control Panel as an admin (always) and setup the desired number of lines. Each line will be setup to receive audio from certain apps depending on the usage you want.

I have the main line for gameplay, my Discord line to record people I’m talking to. I also have a third line for miscellaneous things and a fourth that I’m not using.
Ideally I would’ve have set one line specifically for gaming, but Windows 10 being what it is (and standards being what they are) it ain’t going to work like that.

To complete the audio setup I also need to output those lines to something and that something is my headphones. Each output line automatically inputs the sound into a virtual input too, that way you can listen to it.

Basically this is how things go:

  • Outputs:
    1. Headphones;
    2. Line 1: Main output (default output device);
    3. Line 2: Discord output;
    4. Line 3: Misc output.
  • Inputs:
    1. USB Microphone (default input device);
    2. Line 1: Main output mirrored as input into my headphone;
    3. Line 2: Discord output mirrored as input into my headphone;
    4. Line 3: Misc output mirrored as input into my headphone.

Windows 10 doesn’t remember

Like I said previously one problem that forces me to set the line 1 as the default output device is because Windows 10 can’t exactly remember correctly which app is outputting on which device.

This issue could also be the other way around where an app will have a different output selected but still output to the default device, I’m not sure why but answers would be appreciated.
OBS recording

OBS is a great piece of software that permits me to merge lines and split some too! This is perfect for recording gameplay and streaming (at the same time).

First we need to specify that we will be recording several tracks into our ouput in OBS, for that we need to go into the settings: File, then Settings.
From there we go into the Output section and select in Streaming the first audio track as the one we will be using for streaming like so:

As a bonus you can also use a different audio track for the VOD so you can have avoid having Spotify playing in the VOD (and avoid the DMCA).

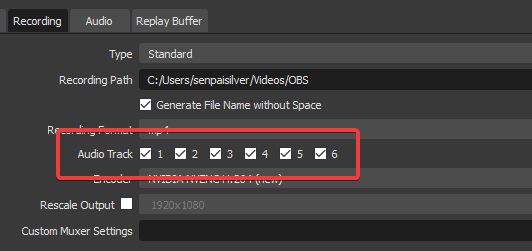
In recording we need to tick all audio track to enable all audio tracksfor later:
Then of course we need to name them and change the audio bitrate if you desire:
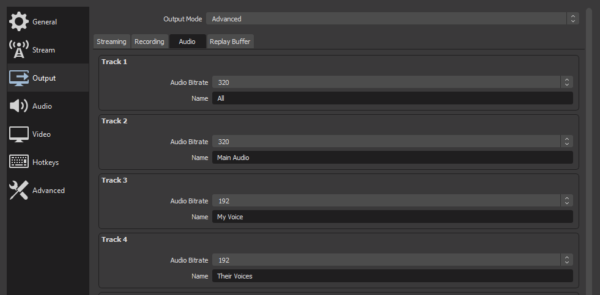
In my case I have everything playing on track 1 since it is the default track.
Track 2 will contain the game audio or the main subject of the video/stream.
Track 3 is my voice, followed by track 4 with voices from Discord.

Having different tracks enables me to control what is output when I record and stream, this way I’m able to make audio commentary when preparing a video and after that replace that commentary with a carefully recorded one, while keeping the gameplay audio without altering it.

To select where what track plays it’s necessary to go into the Edit menu, then Advanced audio properties. Set the different inputs and outputs as you wish in the new window:

Keep the first track checked for all lines, check the other numbers as you need.

Troubleshooting: static/glitch audio

After a while if the computer is not rebooted for days it might happen that the audio fizzles, glitches or becomes static. This isn’t a good experience.

The fix consists in restarting Virtual Audio Cable or the audio service from the control panel (as an admin).
Going further with FFMpeg

This is my follow up to getting started with FFmpeg. I strongly recommend getting to know the tool better in my previous post about it.

Concatenate

Multiple clips can be merged together with the concat demuxer. The idea is to create a text file with a list of files to concatenate together (in order), the format is as follows:

# List of files in order
file './file1.mp4'
file './file2.mp4'
file './file3.mp4'

For the lazy people like me it’s possible to use shell scripting to generate this list:

for f in ./*.mp4; do
  echo "file '$f'" >> list.txt
done

Then you need to feed the file as an input and specify the format (-f) as concat:

ffmpeg -f concat -i list.txt -c copy output.mp4

The wiki page speaks more in detail about this feature.

Extracting the frames

It is quite simple to extract all the frames from a video as pictures.

ffmpeg -i input.mp4 frame_%03d.png

In this command we extract every frame from input.mp4 as PNG pictures. We use the printf format for the numbering of the frame (we pad with 0 the %d for 3 characters).

It’s possible to use the parameters for the start and length of the clip to extract part of the frames or just simply limit number of frames to extract with -vframes. We can also specify a different framerate to work with during this process with -vf fps=1.

Hardware acceleration encoding

For maximum speed it is possible to use a hardware encoder for H264, I will only cover how to do this with an NVidia GPU (NVENC).

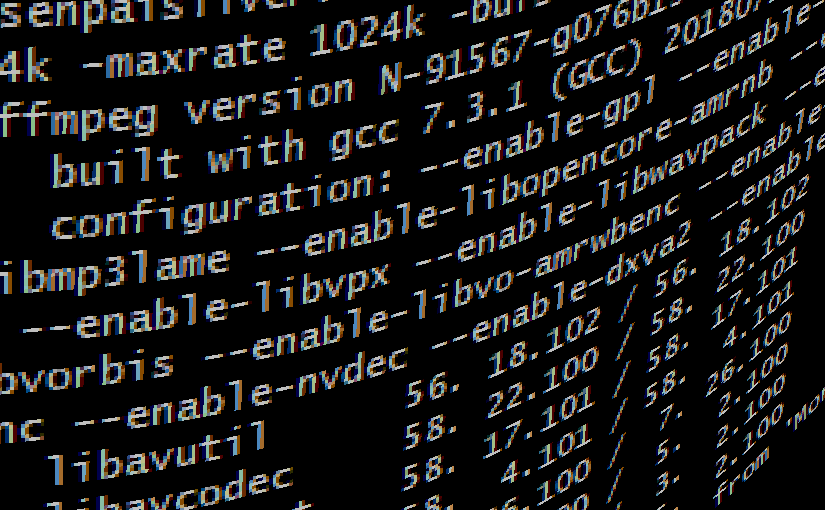
First check that FFmpeg has not been configured with --disable-nvenc, this will appear in the banner when running FFmpeg if NVENC is disabled.

ffmpeg -ss 14:01 -i "input.mp4" \
  -c:v h264_nvenc               \
  -b:v 60000k                   \
  -t 0:30
  output.mp4

This looks exactly as encoding, except the codec on line 2 is different, it has _nvenc appended to it. This is really simple and will boost the encoding drastically.

Reading more

Please check out the following pages if you wish to know more:

Getting started with FFmpeg

The tool I use the most to clip videos and (re)encode media is FFmpeg, a command line bundle of utilities and libraries that is very powerful but not necessarily intuitive.

This is a small guide about the most useful commands.

Basic command line

The basic command is composed by an input and an output:

# Conserve the same format
ffmpeg -i "./input.mp4" "./output.mp4"

# Conserve the same exact encoding settings
ffmpeg -i "./input.mp4" -c copy "./output.mp4"

# Conserve only the sound
ffmpeg -i "./input.mp4" "./output.mp3"

In the command line we have the input parameter marked by the -i option. The output is positioned at the end of the command.

The -c argument correspond to video and audio codecs when followed by copy to conserve the same streams as they were encoded in the input.

Argument quirks

FFmpeg uses the position of the arguments, the input cannot be place elsewhere than at the start of the line and all options related to the input must be placed before the input file.

The output options can be place after the inputs.

Extracting a clip

Sometimes you are proud of the way you handled a boss in a game or you just want to clip out a part of a movie, to do that you will need to provide the start of the clip and sometimes the length of the clip you wish to extract.

ffmpeg              \
  -ss 01:37         \ 
  -i "./input.mp4"  \
  -t 01:00          \
  "./output.mp4"

Let’s break down this command line by line:

  1. We call FFmpeg;
  2. We set the start of the clip with -ss and specifying a time code;
  3. We set the input file;
  4. We set the length of the clip;
  5. We set the output.

The start and length are expressed as a time code:

Hours Minutes Secondes Milliseconds
00 : 01 : 37 . 000

In our case we are working with minutes and seconds, but we can go as low a milliseconds. Keep in mind that if you do not re-encode you might end up with a couple of unwanted frames.

Encoding

More often than not encoding will be necessary if you want to publish online, reduce the file size or edit the media file. Here are a couple of snippets for different formats.

Implicitly convert

For the programmer lazy people like me it’s possible to quickly extract the sound or convert a video as a gif:

# Convert a video to an audio only file
ffmpeg             \
  -i "./input.mp4" \
  "./output.mp3"

# Convert to a gif
ffmpeg             \
  -i "./input.mp4" \
  "./output.gif"

This will use default settings, you can tweak the settings by going in-depth depending on the output format you choose (Encode/MP3).

Same codec, different bitrate

Changing the bitrate is possible, for a loss in quality.

# Convert to h264 with a bitrate of 
ffmpeg             \
  -i "./input.mp4" \
  "./output.mp4"

It’s also possible to run two passes by adding the parameter -pass with the argument 1 or 2 for the first and second pass.

# Convert to h264 with a bitrate of 
ffmpeg -i "./input.mp4" -c:v libx264 -b:v 2600k -pass 1 -an -f mp4 /dev/null
ffmpeg -i "./input.mp4" -c:v libx264 -b:v 2600k -pass 2 -c:a aac -b:a 128k "./output.mp4"

As you see on line 2 we use the argument -an to not treat the audio but during the second pass we specify a codec with -c:a and the audio bitrate -b:a, this is because the first pass only treats the video stream.
If you wish you can add the audio the the first pass, nothing is stopping you from doing so.

We still supply the video codec for both passes with -c:v and the bitrate -b:v.
Please note that bitrates can also be expressed in other units such as M for megabits.

We also don’t output the video stream to a file on line 2 because we are having FFmpeg generate a log file for the second pass. We also need to specify the output format to the encode with -f so that the second pass is not lost.

You can read more on h264 encode on the FFmpeg wiki.

What about the WebM format? Well it’s a bit the same but with different codecs:

# Convert to a webm (VP9)
ffmpeg             \
  -i "./input.mp4" \
  -c:v libvpx-vp9  \
  -crf 10          \
  -b:v 0           \
  -c:a libvorbis   \
  "./output.webm"

A new option on line 5 is the constant quality mode and this is the reason we have set the video bitrate to 0. Instead of imposing a fixed bitrate we will instead of have a variable bitrate used to target the quality we want.
It is possible to omit -crf and specify a video bitrate instead.

If you wish to target a lossless quality you can do so by setting the argument -lossless to 1.

VP9 does support two pass encoding and will work the same as h264.

Read more about VP9.

Editing

It’s also possible to reduce the frame rate and the resolution.

ffmpeg             \
  -i "./input.mp4" \
  -r 25            \
  -vf scale=160x90 \
  -c:v libvpx-vp9  \
  -b:v 2M          \
  -c:a libvorbis   \
  "./output.webm"

Here we reduce the frame rate to 25 with the option -r. The resolution is lowered with option -vf scale= to 160 by 90. It’s possible to keep the aspect ratio by specifying -1 in the scaling such as scale=1280x-1 to scale down to 720p from 1080p (assuming the aspect ratio was 16:9).

Conclusion

FFmpeg is a great tool that can basically do anything when working with media files. It’s very popular and used everywhere because of how powerful it is.

Remap Ansel hotkey

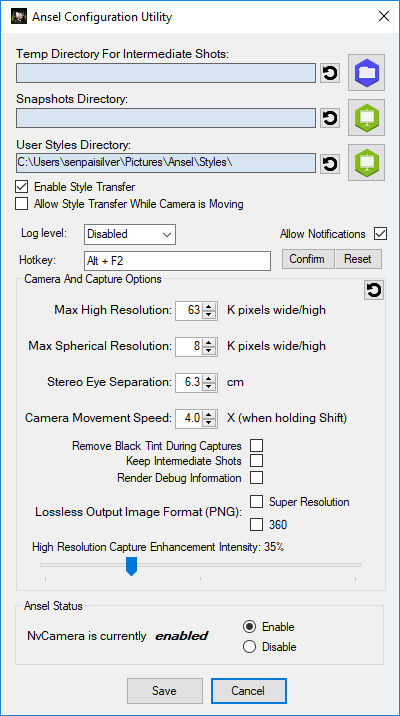
Ansel is Nvidia’s tool that is used for making high resolution, 360° and stereoscopic screenshots. You can move around freely in a paused scene to capture your character’s best side.

Sadly during action ALT+F2 is quite hard to hit. Let’s remap the key.

Launching the configuration utility

To launch the utility hit Windows+R and paste this path:

%PROGRAMFILES%\NVIDIA Corporation\Ansel\Tools\NvCameraConfiguration.exe

You should be greeted with this window:

The input hotkey is used to remap, hit the key or the combination you wish to use then confirm and save.

I have tested this on Windows 10 with the Witcher 3.

Source: https://forums.geforce.com/default/topic/957949/ansel/any-way-to-rebind-keys-/

Slack and HexChat

Slack is great for chatting with your team and you should use it when managing a team with Hangouts or Skype isn’t enough.

HexChat is certainly the best IRC client for Windows.

Enabling IRC gateway

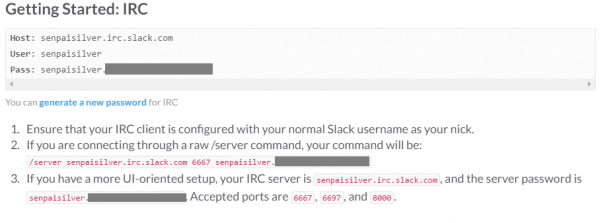
To enjoy Slack on HexChat or any other IRC client you need to to enable IRC gateway you must go to your settings:

https://<your_team>.slack.com/admin/settings#gateways

Tick “enable IRC gateway” then go to your account settings to find your credentials:

https://<your_team>.slack.com/account/gateways

Screenshot (285)

Setting up HexChat

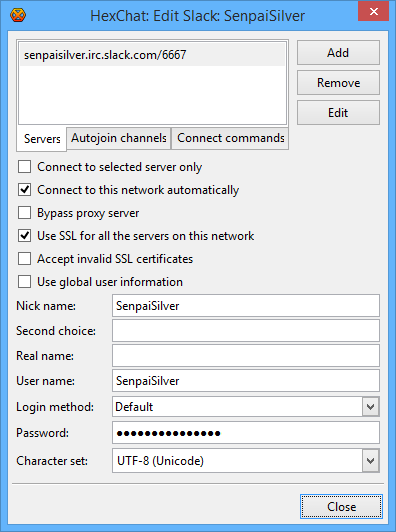
Those settings will be useful for when you add a new server to connect on your IRC client. You’ll need to untick the “use global user information” checkbox and the pass needs to be entered into the password text box with login method set to default in hexchat.

You’ll also have to enable SSL if your gateway is SSL only.

Screenshot (286)

Once set, connect and enjoy.