FFmpeg to infinity and beyond!

My love for FFmpeg knows no bounds and whenever I need to do some slick slicing & splicing I always go with FFmpeg (or Avidemux).

Command line is bash and you’ll obviously need FFmpeg.

Turning a video into a high quality GIF

Turning a video that is over 256 colors into a GIF is an impossible task if you wish to keep all the color information, the GIF format just isn’t designed for that at all.
But what if there was a way to still convert the video into an acceptable GIF?

ffmpeg -i input.mp4 \
    -vf "split[s0][s1];[s0]palettegen[p];[s1][p]paletteuse" \
    -loop 0 output.gif

It is possible to generate a color palette with FFmpeg and use it (thanks to a SuperUser post).

The explanation for the video filters used boils down to:

  • palettegenpaletteuse generate and use the generated custom palette;
  • split helps making this command a one liner because the usual way would be to output the palette to a file before using it;
  • loop set to 0 means we have a repeating GIF, otherwise it will loop with the provided number (and no loop is playing only once).

With a complex filter it’s possible accelerate the gif too:

ffmpeg -i input.mp4 \
    -filter_complex "split[s0][s1];[s0]palettegen[p];[s1]setpts=0.5*PTS[s1_fast];[s1_fast][p]paletteuse" \
    -loop 0 output.gif

But my source is high resolution, can I scale it down? Yes!

ffmpeg -i input.mp4 \
    -vf "scale=320:-1:flags=lanczos,split[s0][s1];[s0]palettegen[p];[s1][p]paletteuse" \
    -loop 0 output.gif

The scale filter can be set to keep the aspect ratio with -1 like in this case with 320:-1 but that’s not all ! We can also reduce the framerate by prepending fps=10.

While I understand that 10 FPS is pretty low, this is GIF territory so it’s not the best thing ever en 2024+.

Keep in mind that GIFs at 60FPS don’t perform well and are pretty heavy on space. So that why you should reduce the framerate with the -r parameter or in the -vf parameter.

Scroll text on a video

This is one part of the thing I do on the music videos I download from YouTube to use while I’m streaming (of course the audio never makes it in the VOD for obvious DMCA reasons).

For the story I decided to display part of the video on my overlay but have the title scroll (when it’s wider than the video). I won’t be sharing my script but I will be sharing the command line I use with FFmpeg to make text scroll.

# Do not forget to escape quotes, commas and colons too
TITLE="My super song\\: Ayyy LMAO - By the \\\"Senpai\\\""

ffmpeg -i input.mp4 \
    -acodec copy -vcodec h264_nvenc \
    -vf "drawtext=text=\'${TITLE}\':fontfile=./NotoSansJP-VariableFont_wght.ttf:y=(h-text_h)/2:x=w-mod(max(t-0\\,0)*(120)\\, 2*(tw+150)):fontcolor=ffcc00:fontsize=70:shadowx=2:shadowy=2:box=1:boxborderw=3:boxcolor=#000000AA" \
    -b:v 8M -rc vbr -cq 19 -preset slow -profile:v main \
    output.mp4

To avoid a gap in the scrolling it’s possible to add a second filter that will be delayed to avoid having a small gap:

# Do not forget to escape quotes, commas and colons too
TITLE="My super song\\: Ayyy LMAO - By the \\\"Senpai\\\""

ffmpeg -i input.mp4 \
    -acodec copy -vcodec h264_nvenc \
    -vf "drawtext=text=\'${TITLE}\':fontfile=./NotoSansJP-VariableFont_wght.ttf:y=(h-text_h)/2:x=w-mod(max(t\\,0)*(120)\\, 2*(tw+150)):fontcolor=ffcc00:fontsize=70:shadowx=2:shadowy=2:box=1:boxborderw=3:boxcolor=#000000AA,drawtext=text=\'${TITLE}\':fontfile=./NotoSansJP-VariableFont_wght.ttf:y=(h-text_h)/2:x=w-mod(max(t-(tw+150)/(120)-0\\,0)*(120)\\, 2*(tw+150)):fontcolor=ffcc00:fontsize=70:shadowx=2:shadowy=2:box=1:boxborderw=3:boxcolor=#000000AA" \
    -b:v 8M -rc vbr -cq 19 -preset slow -profile:v main \
    output.mp4

Of course you’ll need to encode the video and have the appropriate fonts installed for this to work. The original audio has been kept because we do not need to re-encode it.

Let’s breakdown the filter element by element as it is really messy:

drawtext=
  text=\'${TITLE}\'
  fontfile=./NotoSansJP-VariableFont_wght.ttf
  y=(h-text_h)/2
  x=w-mod(max(t\\,0)*(120)\\, 2*(tw+150))

First we use the filter called drawtext and it will take multiple parameters:

  • text will be the input text, as we are passing it from the command line we need to escape the quotes, colons and commas.
  • fontfile is a relative path to a font, in my case I went with NotoSansJP as it has support for Japanese characters too;
  • xy are the position of the text and instead of using a static position we pass a formula:
    • w stands for the width of the video;
    • tw or text_widthis the width of the rendered text;
    • text_h or th is the height of the rendered text;
    • t represents the timestamp in seconds and can be used for math operations, in this case we use it make the text scroll at a proper speed;
    • Doing (h-text_h)/2 simply means we are centering text horizontally.
  • The other parameters are not really important.

The trick to having scrolling text with no gap if by having the same filter repeated a second time but with a delayed x parameter as such:

x=w-mod(max(t-(tw+150)/(120)\\,0)*(120)\\, 2*(tw+150))

In this case the 150 we had as the second parameter to mod is used in the first parameter with the text width parameter. In fact there’s no delay, the text is just positioned off screen. The following values can be called:

  • 150: Margin;
  • 120: Speed;
  • 0: Start time offset.

For a simplified x parameter (pseudo code explanation):

MARGIN=150
SPEED=120

# First title
x=
  w-mod(
    max(t, 0) * (${SPEED}), 2 * (tw+${MARGIN})
  )

# Second title
x=
  w-mod(
    max(t - (tw + ${MARGIN}) / (${SPEED}), 0) * (${SPEED}), 2 * (tw + ${MARGIN})
  )

It’s confusing but that’s how it works:

# Do not forget to escape quotes, commas and colons too
TITLE="My super song\\: Ayyy LMAO - By the \\\"Senpai\\\""
MARGIN=150
SPEED=120

ffmpeg -i input.mp4 \
    -acodec copy -vcodec h264_nvenc \
    -vf "drawtext=text=\'${TITLE}\':fontfile=./NotoSansJP-VariableFont_wght.ttf:y=(h-text_h)/2:x=w-mod(max(t-0\\,0)*(${SPEED})\\, 2*(tw+${MARGIN})):fontcolor=ffcc00:fontsize=70:shadowx=2:shadowy=2:box=1:boxborderw=3:boxcolor=#000000AA,drawtext=text=\'${TITLE}\':fontfile=./NotoSansJP-VariableFont_wght.ttf:y=(h-text_h)/2:x=w-mod(max(t-(tw+${MARGIN})/(${SPEED})-0\\,0)*(${SPEED})\\, 2*(tw+${MARGIN})):fontcolor=ffcc00:fontsize=70:shadowx=2:shadowy=2:box=1:boxborderw=3:boxcolor=#000000AA" \
    -b:v 8M -rc vbr -cq 19 -preset slow -profile:v main \
    output.mp4

In testing it appeared that sometimes long titles might glitch out a bit and not have a background. Please do some testing and tweak the commands as needed to fill your needs.

Two scrolling titles might not be needed anyway!

Resize the video

Part two of what I do the YouTube music video I use on my stream, I resize them to an appropriate size so it doesn’t take all the screen but still keeps the proper aspect ratio.

ffmpeg input.mp4 \
    -acodec copy -vcodec h264_nvenc \
    -vf "scale=640:-1,crop=in_w:120:0:in_h/2" \
    -b:v 8M -rc vbr -cq 19 -preset slow -profile:v main \
    output.mp4

In this case I’ve used my GPU to do some encoding, feel free to encode however you want. The original audio has been kept because we do not need to re-encode it.

You can combine the filter that adds the scrolling text with the resized output but ordering as follows:

  • Resize the video;
  • Use a comma , to separate filters;
  • Add the scrolling text.

It’s important to keep things in order and you’ll have this big fat command that I’ve reworked a bit to make it easier to appreciate:

# Do not forget to escape quotes, commas and colons too
TITLE="My super song\\: Ayyy LMAO - By the \\\"Senpai\\\""
MARGIN=150
SPEED=120

# Font and box parameters
FONTFILE="./NotoSansJP-VariableFont_wght.ttf"
FONTCOLOR="ffcc00"
BOXCOLOR="000000AA"
FONTPARAMS="fontcolor=${FONTCOLOR}:fontsize=70:shadowx=2:shadowy=2:box=1:boxborderw=3:boxcolor=#${BOXCOLOR}"

# Title scrolling
TITLE_ONE="y=(h-text_h)/2:x=w-mod(max(t-0\\,0)*(${SPEED})\\, 2*(tw+${MARGIN}))"
TITLE_TWO="y=(h-text_h)/2:x=w-mod(max(t-(tw+${MARGIN})/(${SPEED})-0\\,0)*(${SPEED})\\, 2*(tw+${MARGIN}))"

# Scaling (+lanczos as an example) and cropping
RESIZE_LANCZOS="scale=640:-1,crop=in_w:120:0:in_h/2"
RESIZE="scale=640:-1:flags=lanczos,crop=in_w:120:0:in_h/2"

ffmpeg -i input.mp4 \
    -acodec copy -vcodec h264_nvenc \
    -vf "${RESIZE},drawtext=text=\'${TITLE}\':fontfile=${FONTFILE}:${TITLE_ONE}:${FONTPARAMS},drawtext=text=\'${TITLE}\':fontfile=${FONTFILE}:${TITLE_TWO}:${FONTPARAMS}" \
    -b:v 8M -rc vbr -cq 19 -preset slow -profile:v main \
    output.mp4

And this was my secret behind the resized, cropped music videos with scrolling text.

Homework: Combine EVERYTHING into a GIF

It’s as simple as adding the full filter for generating the palette and the gif from the palette. I kid you not! But this is your homework on how to make that work: just don’t forget to remove audio and video encoding.

Beyond infinity

I’d recommend to check ffmprovisr which is a very good guide on how to do some things.

As I don’t support AI I can’t really recommend using ChatGPT to write FFmpeg commands. It might help you with some stuff keep in mind that it can be confidently wrong.

Stop upscaling video to 4K60FPS

Updated 2023/01/03: Added a bit about Frieren EP9.

On YouTube there’s always someone using AI to upscale to 4K and interpolate frames in anime openings. Some people think it looks good because it “moves” more and they are wrong.

I like referencing the video of Noodle on Smoother animation ≠ Better animation. You do not need to watch this video to understand this post but I still recommend watching it as Noodle is an actual animator as I don’t plan on just repeating what this video says.
I’ll be using my own words and examples.

What is upscaling?

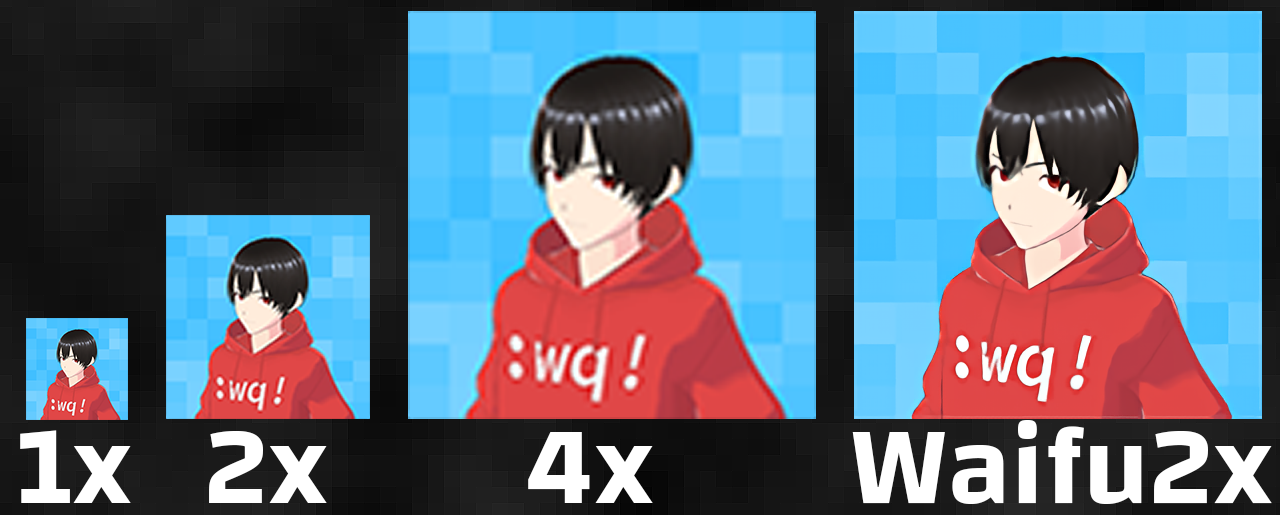
When it comes to images and videos upscaling is increasing the dimension of the frame. To illustrate this example let’s take a 102 by 102 pixel image and upscale it using Photoshop and Waifu2x:

Click to enlarge

Doubling the image’s dimension does harm the quality of the image by doubling and softening the pixels. The 4 times image is unusable and down right bad.

Waifu2x uses a deep convolutional neural network to try minimize the quality loss and retain the detail from the original image. It works quite nicely bit but it far from perfect. Other AI enhancements can be used to upscale images.

In all the illustrated cases we are taking an image that is 102 pixels by 102 and adding more pixels. The only thing we can do is thus interpolating.

What is interpolating?

Interpolation is a very complicated subject that can be basically watered down to estimating new data based on existing data.

In the case of this post I already referenced interpolating pixels to fill in the blanks when upscaling an image. If we took an image and did not interpolate pixels we would retain the original pixels but spaced out in a grid like this:

Click to enlarge

Since I’m increasing the size from 102 by 102 pixels to 408 by 408 pixels I’ve blacked out the pixels that will have to be estimated. Different sharpening and scaling algorithms will process the images differently and alter the output.
This example is only illustrating what is missing and what needs to be generated.

The same can be explained for increasing the framerate from 23.976 to 60FPS. Wait a second, 23.976FPS to 60FPS. Decimal numbers?

That’s a fun framerate to multiply to 60. Where are my comfy integer numbers? I like whole numbers. Anything that floats is complicated and scary.

Why interpolating DOESN’T work?

If upscaling images with AI can work pretty well, on the other hand the frame rate interpolation doesn’t work.

First of all the video frame rate needs to be constant, if it’s defined as 23.976FPS we would need multiply it by 2.5 to reach 59.94FPS to get as close to 60FPS as possible but it is not a whole number so we will need to alter existing frames while generating 1.5 frames for each existing frames.

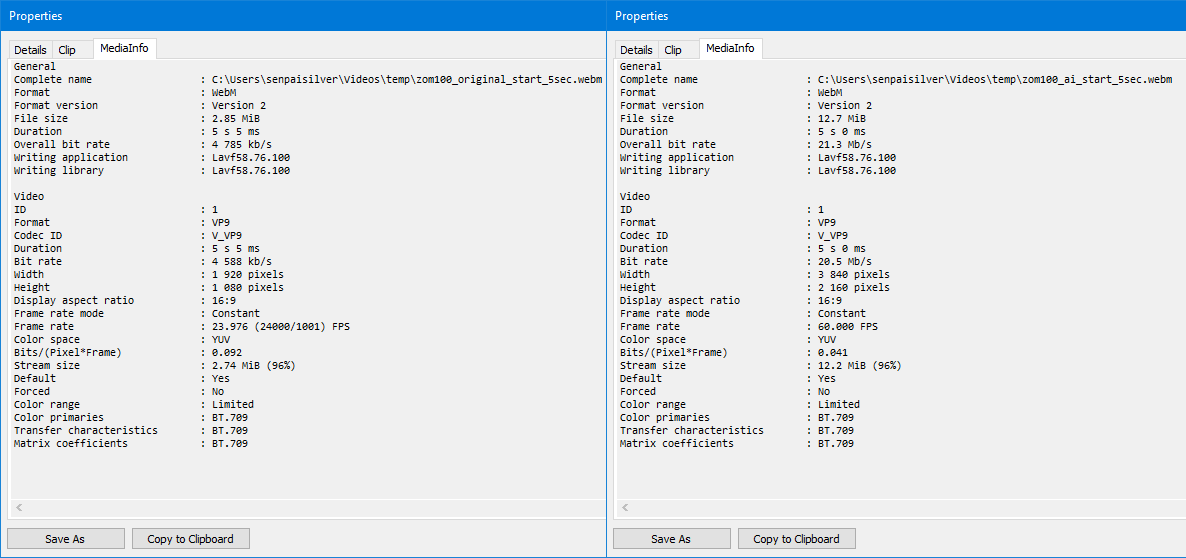
And this breaks everything. Here are two 5 seconds sequences taken from the opening of Zom 100 on YouTube.

Original video:

AI enhanced video:

Let’s get the total number of frames the lazy way:

ffprobe -v error -select_streams v:0 -count_packets \
    -show_entries stream=nb_read_packets -of csv=p=0 \
    zom100_original_start_5sec.webm
# 127

ffprobe -v error -select_streams v:0 -count_packets \
    -show_entries stream=nb_read_packets -of csv=p=0 \
    zom100_ai_start_5sec.webm
# 323

If my math is right 323 / 127 = 2.543307086614173 making us close to the 2.5 multiplier. But let’s forget numbers because what really counts is the visuals.

Why is it ugly?

The gist of it is that we a creating new frames based on the previous and next frame while also altering existing frames to target the 60FPS that is being uploaded.

Let’s take a look frame by frame, each origin frame lasts for 2 seconds while AI enhanced frames last for 1/3 of a second. Left and right video isn’t synchronized as the frame rate cannot be divided by an integer value.

Obvious artifacting appears very early on around anything that moves. Sometimes it’s just blurring just like if motion blur (on the bike) was introduced and sometimes the shapes are deformed (such as the numbers).

Another example:

The upscaled image is also sharpened and denoised to some degree which ends up messing up the contrast on the line art.

But 60FPS is nice when gaming

Yes, when playing 3D games each frame is rendered before being displayed on the screen. Videos are different because each frames are already rendered.

This is like the difference between pre-rendered cutscenes and in-engine cutscenes. Pre-rendered cutscenes are designed in a way to be of a certain resolution, frame rate, compression and colorspace.

In-engine cutscenes on the other hand will usually target the game’s resolution, framerate, colorspace without applying any compression. Usually because some game engines will lock the frame rate to a lower value such as 30FPS because of engine limitations bad engine programming and design.

Rendering 30, 60, 120 or 144 frames a second by taking a picture of a 3D scene that is built right before being displayed is the key to fluidity.
Already rendered content will never be able to do such thing because of the missing information.

Real world example from 60 to 23.976 to 60

Here is NieR Automata at 60FPS:

Reducing the frame rate to 23.976FPS makes the motion look less satisfying:

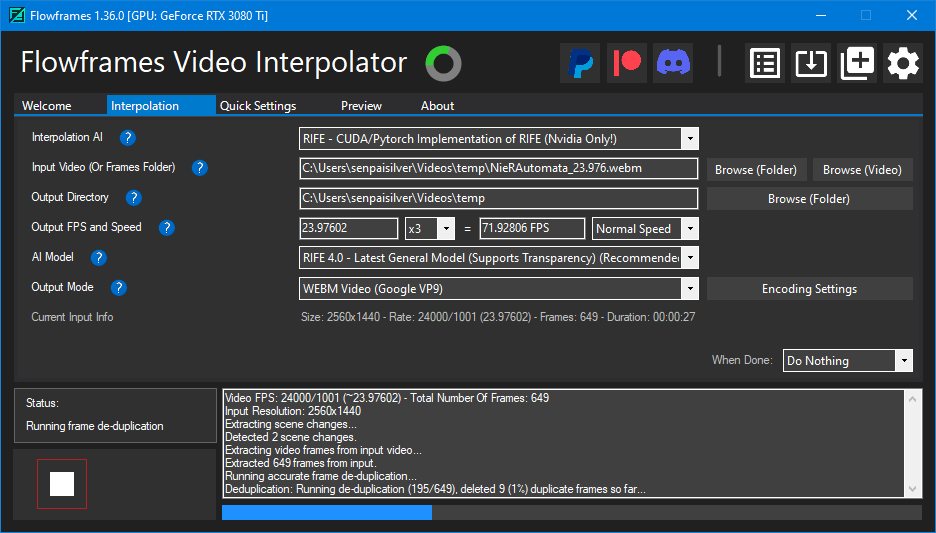
Now let’s interpolate the framerate to 71.92806FPS and limit it to 60FPS with Flowframes that permits me to double or triple the frame rate (not set it to 60 directly) and notice how the video is choppy:

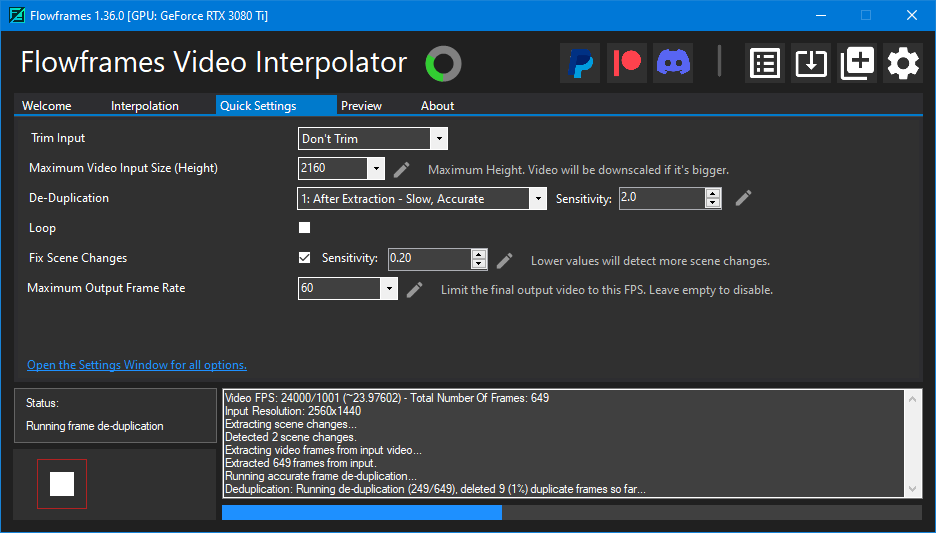
Here are the settings used:

This is exactly what is being done to those anime openings… Disgusting.

Let’s compare the original native 60FPS footage with the interpolated to 60FPS from 23.976FPS:

Click to enlarge
Click to enlarge
Click to enlarge

The screenshots talk by themselves and expression the difference in a much more obvious way, but let’s go a bit further and slow down the video clips while having them side by side and centered on 2B:

Slowed down to 25% does show how bad it gets. Same goes for that Jujutsu Kaisen S2 opening:

It jitters, the text is deformed… I hate it. Anime is not drawn for 60FPS.

Misguided demande exists

Sadly TVs are being sold with some smoothing technology and marketed as good looking. Not sure how people really perceive it as something nice while it should be weirding them out.

I also remember that the Hobbit being 48FPS at the movie theatre was something that did weird out people quite a bit, but was it because of the 3D effect included too? No idea.

NVidia is also working on adding frame rate smoothing to their GPUs when encoding, weird idea…

The reason I made this post is that I’m tired of seeing openings such as Zom100 and Jujutsu Kaisen S2 being upscaled, sharpened to hell and then interpolated to get weird motion and no improvement.

Conclusion

Most people that aim for +60FPS content do so because fluidity is important and enhances the pleasure of the visuals. Sadly most people don’t seem to actually pay attention to the composition and missout on the botched detail and weird movements.

Do I envy people that are not able to perceive what’s wrong with frame rate interpolating? No I don’t. I just think it’s sad that they are missing out on the destroyed detail.

This trend of upscaling and interpolating the framerate will not die anytime soon and this makes me sad because we have some very nice animations that are design for low framerate and will only work like so.

Spoilers ahead but here are some nice animations:

In all of the above scenes we have animations that are not 60FPS and do not need to be. Motion is properly conveyed through direction and effects.

As a closing note I suggest watching Satoshi Kon Editing Space & Time by Every Frame a Painting. At the 4:47 mark they talk about motion, it’s interesting to see how animation can convey more actions with less frames than live action.

Sousou no Frieren EP9

If Japanese animation proved anything in 2023 it’s that anime still doesn’t need to by high framerate. In Sousou no Frieren episode 9 we have multiple fights happening at the same time in the second half of the episode and the animation is perfect.

The fights are either fast paced and smooth or detailed and smooth. No frame is out of place. This is the standard of animation that we would expect from a full blown movie.

Since it’s copyrighted and I don’t want to stretch faire use (especially because Japan doesn’t really practice that) I will only be posting one clip.

Mad House published some tweets to show the behind the scenes for the keyframes:

Those keyframes are so clean the finished version can only be the best:

Full animated scene from Sakugabooru.

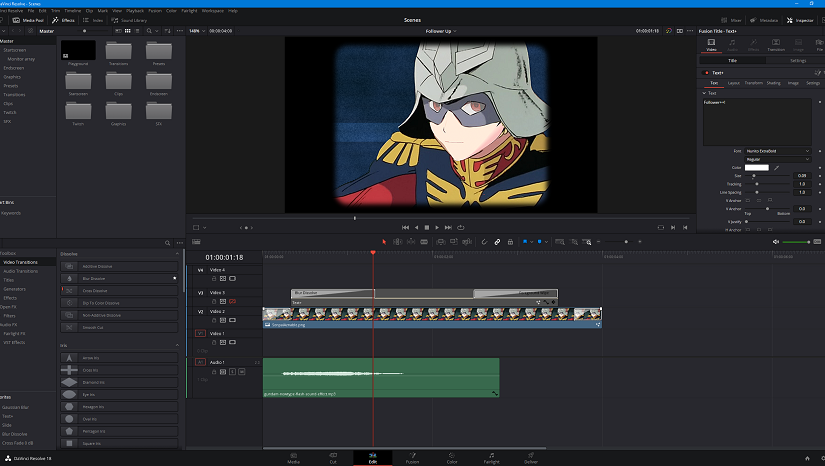
Export video with alpha channel in Davinci Resolve

A great alternative to the Adobe video editing suite is Davinci Resolve because it’s free (paid version exists, locks just a bit of features).

Exporting in Davinci Resolve

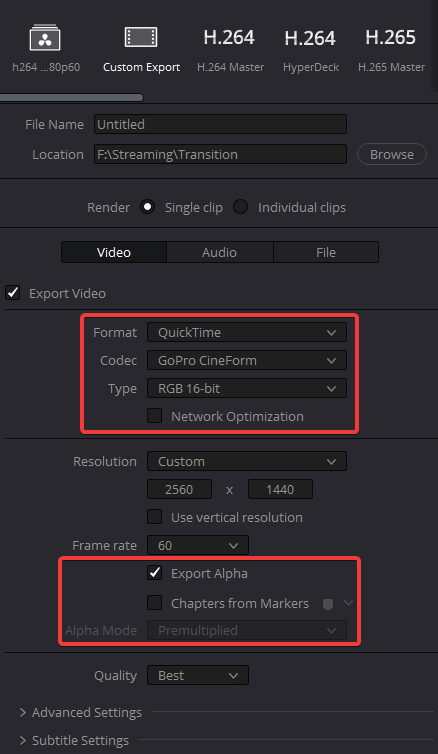
Let’s say you have a timeline with your elements places and transparency set. You will now go to the deliver tab, select Quicktime as the format and GoPro Cineform as the codec.

The most important thing is to select RGB-16 in the type and tick export Alpha.

This is the final step unless you need to publish the file as a WebM.

Convert the MOV to WEBM

When building alerts and overlays, certain services like StreamElements won’t accept the Quicktime file, you will need to convert it to a WebM with the VP9 codec to retain the transparency.

Use FFmpeg with the following command line:

ffmpeg -i inputmove.mov -c:v libvpx -pix_fmt yuva420p -b:v 2000k -auto-alt-ref 0 output.webm

Keep in my you can change the bitrate and increase it by tweaking the value following -b:v.

Conclusion

This small trick is something I spent a long time looking for and I have had mixed results with it. But lately I’ve been getting into preparing custom alerts on StreamElements for my own streams and I was hoping to add something nice.